

We all know that archery is an ancient art that has been around for centuries. It’s been used for hunting, warfare, and sport. And while the technology and materials have evolved over time, the basic principles have remained the same. Recurve bows are a popular choice for archers of all levels because of their simplicity, versatility, and effectiveness.
Recurve bows get their name from the way the limbs curve away from the archer when unstrung. This design allows for more energy to be stored in the bow, resulting in higher arrow speeds and greater accuracy. They’re also more compact and portable than other types of bows, making them a great choice for hunting and outdoor activities.
When looking for the best recurve bow, there are a few things to consider. The draw weight and length are important factors to ensure that the bow is comfortable and easy to use. The material and construction of the bow can affect its durability and performance. And of course, the overall feel and balance of the bow are crucial for a smooth and enjoyable shooting experience.
We spent countless hours researching and testing various recurve bows to identify the ones that stand out from the rest. In this article, we’ll share our top picks for the best recurve bows on the market today. Whether you’re a beginner or an experienced archer, we’ve got you covered.
While mastering the basics of recurve archery is essential, applying those skills to small game hunting opens up a whole new world of challenge and reward. To truly excel in this specialized area, having a dedicated guide is invaluable. Learn how to take your bowhunting skills to the next level with our complete Small Game Bowhunting Guide »
Best Recurve Bows
Looking for a reliable and efficient recurve bow? Look no further! Our team has researched and tested the top recurve bows on the market to bring you our list of the best. Whether you’re a beginner or experienced archer, we’ve got you covered. Check out our top picks below and find the perfect recurve bow for your needs.
Samick Sage Recurve Bow

If you’re looking for an economical entry to intermediate level bow, the Samick Sage Recurve Bow is a great choice.
Pros
- Lightweight and comfortable to hold
- Pre-installed threaded brass bushings for various attachments and upgrades
- Limbs are interchangeable and can be purchased separately
Cons
- Heavy draw strength for beginners
- Some users received the wrong hand orientation
- Some users had to purchase a separate bowstring
We recently tried out the Samick Sage Recurve Bow and were impressed with its ergonomic design and interchangeable limbs. The lightweight Maple wood risers make it easy to hold, and the threaded brass bushings allow for easy customization.
However, we found the draw strength to be quite heavy, which may not be ideal for beginners. Additionally, some users reported receiving the wrong hand orientation, so be sure to double-check before purchasing. Finally, some users had to purchase a separate bowstring, so keep that in mind when budgeting.
Overall, if you’re looking for an affordable and customizable recurve bow, the Samick Sage is a solid choice.
TOPARCHERY Archery 57″ Takedown Recurve Bow

If you are looking for an affordable recurve bow, then TOPARCHERY Archery 57″ Takedown Youth Recurve Bow is a great option.
Pros
- The bow is made of high-quality materials that make it durable and long-lasting.
- The ergonomic and unique design makes it comfortable to hold and shoot for extended periods of time.
- It is easy to assemble and disassemble, making it convenient for storage and transport.
Cons
- The bowstring may need to be replaced after a while of use.
- The bow may not be suitable for experienced archers who require higher draw weights.
- Some users have reported that the bow may have some hard edges that can be uncomfortable to hold.
We were impressed with the TOPARCHERY Archery 57″ Takedown Youth Recurve Bow. The flexible Daclone bowstring and durable high-strength nylon fiber riser can hold enough resistance and stretch. The strong epoxy limb with smooth edges will protect you from getting hurt.
The riser is designed with rounded edges and a fine finished handle, making it very comfortable to hold. This comfort will allow you to have the best experience shooting multiple arrows or for extending amounts of time. Our design is also appealing to the eye, making it unique in its own ways.
The bow is available in both right and left-hand orientation. Holding the riser with your left hand and pulling the string with your right hand is for a right-handed bow. By holding the riser with your right hand and pulling the string with your left hand is a left-handed bow. Limbs could be assembled or disassembled easily by using an allen key.
This bow is ideal for archery beginners. It features a durable, double arrow rest for both left and right-handed shooters. It is lightweight and easy to take. It improves hand-eye coordination, focus, and concentration.
Overall, the TOPARCHERY Archery 57″ Takedown Youth Recurve Bow is a great gift for archery beginners. It is easy to assemble and disassemble, making it very small when collapsed, and fits in a backpack or hiking pack easily. Please keep in mind that using a stringer tool is the most safe way to properly assemble and disassemble the takedown recurve bow.
KAINOKAI Velociraptor Recurve Bow

If you’re looking for a budget-friendly recurve bow that is both beautiful and functional, the KAINOKAI Velociraptor Recurve Bow is a great choice.
Pros
- The multi-layer composite fiberglass and high-strength maple limbs make this bow durable and sturdy.
- The overall design is unique and attractive, with a dragon theme and beautiful wood grain on the riser.
- The bow is available in both left and right-hand options, with draw weights ranging from 20lbs to 60lbs in 5lb increments, making it suitable for a variety of uses.
Cons
- The included bowstring is of low quality and may need to be replaced.
- Some users have reported issues with the arrow rest that comes with the bow.
- The warranty is only for 1 year, which may not be enough for some users.
We recently had the opportunity to test out the KAINOKAI Velociraptor Recurve Bow, and we were impressed with its performance. The bow is lightweight and easy to handle, with a comfortable grip that allows for steady aim. The limbs are well-crafted and provide good power and accuracy.
One thing to note is that the bowstring that comes with the bow is not of the best quality and may need to be replaced for optimal performance. Additionally, some users have reported issues with the arrow rest that comes with the bow, so you may want to consider purchasing a separate arrow rest if you experience any issues.
Overall, we think the KAINOKAI Velociraptor Recurve Bow is a great choice for anyone looking for a budget-friendly recurve bow that is both functional and beautiful. With its unique design and solid construction, this bow is sure to impress.
EBBQ Bear Super Kodiak Recurve, 60-Inch/45-Pound
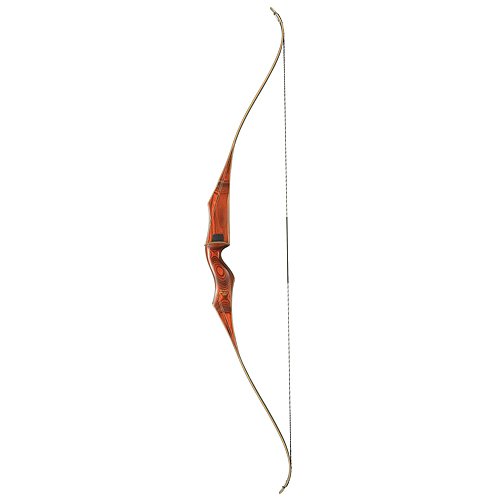
If you are looking for a high-quality recurve bow, the EBBQ Bear Super Kodiak Recurve is an excellent choice.
Pros
- The crowned, cut-past-center arrow shelf with Bear Hair mat and leather side plate ensures accurate shooting.
- The matched gray and brown hardwood laminates provide a sleek and stylish look.
- Made in the United States, this bow is built to last.
Cons
- The stiff pull may make it difficult for some users to shoot comfortably.
- The weight of the bow may be too heavy for some users to handle.
- The price point is higher than some other recurve bows on the market.
We recently had the opportunity to use the EBBQ Bear Super Kodiak Recurve, and we were impressed with its accuracy and overall quality. The crowned, cut-past-center arrow shelf with Bear Hair mat and leather side plate ensured that our arrows flew straight and true every time we shot.
The matched gray and brown hardwood laminates not only looked great but also provided a comfortable grip. We appreciated that this bow was made in the United States, and the attention to detail was evident in its construction.
While the stiff pull may take some getting used to, once we adjusted, we found that the bow was easy to shoot accurately. However, the weight of the bow may be too heavy for some users to handle comfortably.
Overall, we highly recommend the EBBQ Bear Super Kodiak Recurve for anyone looking for a high-quality recurve bow that is built to last. While the price point may be higher than some other options, the quality and accuracy make it worth the investment.
GLURAK Black Hunter Takedown Recurve Bow

We highly recommend the GLURAK Black Hunter Takedown Recurve Bow for anyone looking for a durable and easy-to-use bow for hunting or target practice.
Pros
- The high-elastic fiberglass limbs and bamboo laminates make this bow very sturdy and durable.
- The rounded edges and fine finished wooden handle provide a comfortable grip and protect the user from getting hurt.
- The Takedown feature allows the user to easily change the bow limb to increase or decrease the weight for a better practice experience.
Cons
- Using a stringer tool is recommended for safely taking down and putting together the hunting bow.
- The bow string should be removed after each use to protect the limbs from twisting.
- The bow does not come with a manual.
The GLURAK Black Hunter Takedown Recurve Bow is a great choice for anyone looking for a reliable and durable bow for hunting or target practice. The high-elastic fiberglass limbs and bamboo laminates make this bow very sturdy and durable, and the rounded edges and fine finished wooden handle provide a comfortable grip and protect the user from getting hurt. The Takedown feature allows the user to easily change the bow limb to increase or decrease the weight for a better practice experience.
However, using a stringer tool is recommended for safely taking down and putting together the hunting bow, and the bow string should be removed after each use to protect the limbs from twisting. Additionally, the bow does not come with a manual, which may be inconvenient for some users. Overall, we believe that the GLURAK Black Hunter Takedown Recurve Bow is a great investment for anyone looking for a reliable and easy-to-use bow for hunting or target practice.
Tongtu Recurve Bow Set

If you’re looking for an affordable and easy-to-use beginner’s archery set, then the Tongtu Recurve Bow Set may be a good option for you.
Pros
- Lightweight and easy to assemble
- Durable and quality-tested
- Suitable for both left and right-handed shooters
Cons
- Draw strength may be lower than advertised
- Arrows and accessories may not be of the highest quality
- No place to mount a sight
We recently had the chance to test out the Tongtu Recurve Bow Set, and we were impressed with how lightweight and easy to assemble it was. The durable riser can be taken down and can hold enough resistance and stretch, and the ambidextrous reinforced handle and soft-touch grip make it easy to handle.
One of the best things about this bow set is that it’s suitable for both left and right-handed shooters, thanks to the double arrow rest and alternative 30Lbs and 40Lbs options. It’s also great that the package includes everything you need to get started, including a bow, arrows, target faces, an arm guard, and a finger guard.
However, we did notice that the draw strength may be lower than advertised, and we got several fiberglass splinters when taking it out of the box. Additionally, while the target faces are decent, the arrows and accessories may not be of the highest quality. Finally, if you’re looking to mount a sight, you may need to look for a different bow.
Overall, we think that the Tongtu Recurve Bow Set is a good option for beginner archers who are looking for an affordable and easy-to-use set. Just be aware that the draw strength may be lower than advertised, and the arrows and accessories may not be the highest quality.
PSE ARCHERY Snake Recurve Bow Kit

If you’re looking for a lightweight, durable, and accurate bow for young archers or beginners, the PSE ARCHERY Snake Recurve Bow is an excellent choice.
Pros
- Designed for young archers or teenagers
- Lightweight youth bow
- Complete accuracy
Cons
- May not be suitable for experienced archers
- Only available in one color
- May require additional accessories for advanced shooting
The PSE ARCHERY Snake Recurve Bow is made of an almost indestructible composite material, making it perfect for young archers who are just starting to learn the sport. The bow is lightweight, weighing only 3.2 lbs, which allows young archers to practice for hours without getting tired. The 60″ length and 8³⁄₄” brace height make it easy to handle and maneuver.
The bow is accurate and sturdy enough for the archery range or for high target shooting. It’s also a great bow for fun backyard shooting with your children and friends. The classic one-piece design makes assembly a snap, and it’s made in the USA.
Overall, if you’re looking for a beginner bow that is both durable and accurate, the PSE ARCHERY Snake Recurve Bow is a great choice. It’s perfect for young archers or teenagers who want to learn the sport of archery and have fun doing it.
Southland Archery Supply Spirit 66″ Take Down Recurve Bow

We highly recommend purchasing the Southland Archery Supply Spirit 66″ Take Down Recurve Bow for those looking for an affordable and reliable option.
Pros
- The riser is made from some of the most durable trees in Asia, ensuring a long-lasting product.
- The limbs are made of maple laminations and strong fiberglass, adding to the bow’s durability.
- Both right and left-hand orientation are available, making it accessible for all archers.
Cons
- The bolt holes were not fully protected by a metal sleeve, which may cause issues with the bow’s alignment.
- The bow may require additional setup instructions for beginners.
- Some customers have reported issues with the limb-riser-bolt alignment.
We found that the Southland Archery Supply Spirit 66″ Take Down Recurve Bow is a great option for beginners or experienced archers who want a traditional archery experience. The bow is easy to set up and comes with all the fixtures to add on sights, stabilizers, and other accessories.
The bow’s full 66″ size using a full-size riser is a main distinction from other generic intro models, making it a great option for those looking for a more traditional experience. The bow is also travel-worthy, making it a convenient option for archers on the go.
Overall, the Southland Archery Supply Spirit 66″ Take Down Recurve Bow is a great option for those looking for an affordable and reliable traditional archery experience.
Southwest Archery Spyder Takedown Recurve Bow

If you’re looking for an affordable, high-quality recurve bow that performs well in both hunting and target practice, the Southwest Archery Spyder Takedown Recurve Bow is a great choice.
Pros
- Lightweight and easy to handle
- Accurate and fast shooting
- Comes with all necessary accessories for assembly and use
Cons
- Arrow rest may need to be replaced for optimal performance
- Some buyers have reported issues with the string included in the package
- Not suitable for left-handed archers
We recently had the opportunity to try out the Southwest Archery Spyder Takedown Recurve Bow, and we were impressed by its performance. The bow is lightweight and easy to handle, making it a great choice for beginners and experienced archers alike. It also shoots accurately and quickly, making it a good option for both hunting and target practice.
One of the best things about this bow is that it comes with all the accessories you need to get started, including a riser, matching limbs, a Dacron string, an arrow rest, and a stringer tool. The step-by-step instructional manual also makes assembly and use a breeze.
However, we did notice that the arrow rest included in the package may need to be replaced for optimal performance. Additionally, some buyers have reported issues with the string that comes with the bow, so you may want to consider purchasing a different string separately.
Overall, we would definitely recommend the Southwest Archery Spyder Takedown Recurve Bow to anyone looking for an affordable, high-quality recurve bow that performs well in both hunting and target practice.
Buying Guide
When it comes to buying the best recurve bow, there are several factors that you should consider to ensure that you get the right product. Here are some of the things that you should look at:
Draw Weight
The draw weight is the amount of force that you need to apply to pull the bowstring back to its full length. It is an important factor to consider because it determines the power and speed of the arrow. The higher the draw weight, the more powerful the bow will be. However, if the draw weight is too high, it can be difficult to use the bow effectively. We recommend choosing a draw weight that is comfortable for you to use and that allows you to shoot accurately.
Draw Length
The draw length is the distance between the bowstring and the grip when the bow is at full draw. It is an important factor to consider because it affects the accuracy and consistency of your shots. If the draw length is too short, you may not be able to pull the bowstring back far enough to shoot effectively. If it is too long, you may overextend and lose accuracy. We recommend choosing a bow with an adjustable draw length so that you can find the perfect fit for your body.
Bow Length
The length of the bow is another important factor to consider. A longer bow will generally be more stable and accurate, while a shorter bow will be more compact and easier to maneuver. We recommend choosing a bow length that is appropriate for your intended use. If you plan to use the bow for target shooting, a longer bow may be better. If you plan to use it for hunting or outdoor activities, a shorter bow may be more practical.
Material
The material of the bow can also affect its performance. Most recurve bows are made from wood, fiberglass, or carbon fiber. Each material has its own advantages and disadvantages. Wood is traditional and aesthetically pleasing, but it can be heavy and require more maintenance. Fiberglass is durable and lightweight, but it may not have the same feel as a wooden bow. Carbon fiber is strong and lightweight, but it can be expensive. We recommend choosing a material that suits your needs and preferences.
By considering these factors, you can choose the best recurve bow for your needs and preferences. Remember to take your time and do your research before making a purchase.
Frequently Asked Questions
What recurve bows do Olympic archers use?
When it comes to Olympic archery, the most popular recurve bows used by archers are those made by top manufacturers such as Hoyt, Win&Win, and PSE. These bows are made with high-quality materials and designed to meet the specific needs of competitive archers. Olympic archers use a variety of models from these manufacturers, including the Hoyt Formula Faktor, Win&Win Black Wolf, and PSE Xpression.
What is the best length for a recurve bow?
The best length for a recurve bow depends on a number of factors, including the archer’s height, arm length, and shooting style. Generally, a longer bow will provide more stability and accuracy, while a shorter bow will be more maneuverable and easier to carry. Most recurve bows range in length from 54 to 70 inches, with the most common lengths being 62 and 66 inches.
What are the features of a custom recurve bow?
A custom recurve bow is a bow that has been designed and built to the specific preferences of the archer. Some common features of custom recurve bows include a unique grip shape, custom limb design, and personalized string materials. Custom bows can also be made with a variety of materials, including wood, carbon fiber, and aluminum. The advantage of a custom recurve bow is that it can be tailored to the individual archer’s needs, resulting in a bow that is comfortable to shoot and performs at the highest level.
