
When it comes to archery, the way you hold your bow plays a crucial role in your accuracy and overall performance. As a beginner, it might feel a bit daunting to learn all the techniques and intricacies involved in this sport. But fear not, because with proper guidance and practice, you’ll eventually become a more skilled and confident archer.
In this article, we will explore the proper way to hold the bow when shooting. The key is maintaining a relaxed grip, which will allow you to control the bow without applying excessive pressure. This not only helps you in avoiding arm fatigue, but also contributes to a more stable and consistent shooting experience.
Throughout your archery journey, it’s essential to pay close attention to your grip and make adjustments as needed to fit your personal preferences. Remember, practice makes perfect, so grab your bow and let’s dive into the world of archery with confidence and poise.
Understanding the Basics of Archery Grip
As a beginner archer, it’s essential to learn the basic archery skills needed to hold the bow properly when shooting. A correct grip is crucial to improve your accuracy and minimize the chances of injury.
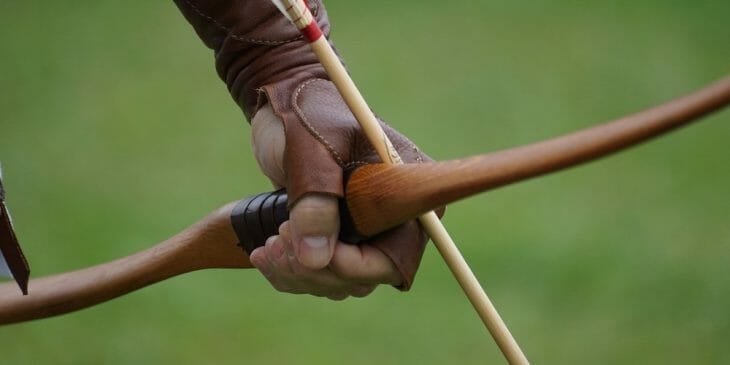
First and foremost, it’s important to find a bow that fits your hand comfortably. A well-fitted bow will help you maintain a relaxed grip without excessive tension. Place your hand on the grip so that the pressure rests on the fleshy part between your thumb and index finger. Your fingers should be relaxed along the side of the grip, with your thumb pointing towards the target. The muscles in your hand shouldn’t clench around the bow, as this can lead to torque and affect your shot.
Next, make sure your arm and wrist are properly aligned. Extend your arm fully and keep your elbow slightly rotated to avoid injury from the bowstring. Your wrist should be neutral, without bent or strained. This position allows for a consistent and stable connection between you and the bow throughout the shot.
As you progress in your archery skills, understanding the correct grip is essential. Remember these key points:
- Find a comfortable, well-fitted bow
- Apply pressure on the grip with the fleshy part of your hand
- Keep your fingers relaxed, and thumb pointing towards the target
- Maintain a neutral wrist position
- Rotate your elbow slightly outward for safety
By practicing and refining your grip technique, you’ll soon be on your way to enjoying the rewarding sport of archery with more accuracy and consistency. Good luck!
The Importance of Bow Grip and Stance
When practicing archery, your bow grip and stance play a crucial role in achieving accurate and consistent shots. Let’s discuss their significance and offer some tips on how to improve your shooting stance and bow grip.
Firstly, your stance serves as the foundation for your shooting form. A proper stance provides balance, stability, and consistency in your shots. To achieve a good stance, stand with your feet shoulder-width apart, and slightly angle your front foot toward the target. Keep your knees relaxed and maintain a straight but not rigid posture.
Moving on to your bow grip, it’s important to focus on your hand position, which directly impacts your shot’s accuracy and consistency. A proper archery grip involves placing the bow’s handle in the webbing between your thumb and index finger, letting it rest on the pressure point in your palm. Avoid gripping the bow too tightly, as it can lead to torque and affect the arrow’s flight.
When working on your form, make sure to focus on these three points:
- Maintain a straight line from your elbow, through your drawing arm, and back towards the target.
- Keep your bow arm extended and relaxed, but not locked.
- Align your drawing hand near your face, using a consistent anchor point such as the corner of your mouth, to ensure a steady release.
In conclusion, developing a strong bow grip and stance are essential elements in improving your archery skills. By practicing and perfecting these techniques, you’ll create a solid foundation for accurate and consistent shooting. And always remember, be patient and stay focused on your practice, as mastering your grip and stance takes time and dedication. Happy shooting!
How to Properly Hold the Bow
When it comes to archery, proper hand placement and grip on the bow are crucial to your success. In this section, we’ll discuss how to hold the bow correctly, focusing on a relaxed grip, the right muscle groups, and hand position.
Firstly, let’s talk about hand placement on the bow handle. The correct way to hold the bow is to place the grip in the webbing between your thumb and index finger. Make sure your knuckles are at a 45-degree angle to the bow, and the remaining three fingers should be relaxed.
Now, let’s focus on the grip. It is essential to maintain a loose grip on the bow handle while shooting. Your grip should be relaxed, not tight. A tight grip can result in accidental torque, negatively affecting your arrow’s flight. Keep in mind that a relaxed grip is especially crucial when using a compound bow or a recurve bow as they require more precision.
When it comes to muscle groups, it is necessary to engage the right ones for proper hand positioning. Primarily, the muscles in the back should be engaged as you draw the string. Using these muscle groups allows for a more stable and precise shot. Additionally, your bow arm should be straight but not locked, and your elbow slightly rotated outward.
Below is a quick recap of the key points for holding a bow properly:
- Hand placement in the webbing between thumb and index finger
- Knuckles at a 45-degree angle
- Relaxed grip on the bow handle
- Utilize back muscles when drawing the string
- Bow arm straight but not locked, with elbow slightly rotated outward
Remember to consistently practice these techniques, and you’ll be on your way to becoming a proficient archer. Happy shooting!
Achieving the Correct Bow Arm Position
First, let’s talk about your elbow. Make sure your elbow is slightly bent, creating a soft curve in your bow arm. A locked elbow can lead to injury, poor form, and inconsistent shots. A slight bend allows for a more stable and relaxed shot, giving your muscles some flexibility to manage their power.
Now, onto your grip on the bow. It’s important to use a relaxed grip when holding the bow. This means not squeezing the bow too tightly and allowing for your hand to maintain a gentle contact with it.
Here are some key points for achieving the correct bow arm position:
- Elbow: Slightly bent, not locked
- Grip: Gentle contact, not too tight
When these tips are used together, your shooting should improve. Remember, always practice and experiment with your bow arm position and form, as everyone is different. Keep your bow arm relaxed and stable, and soon you’ll be hitting those bullseyes!
Fingers and the Anchor Point
When holding the bow, it’s important to focus on two crucial aspects: your fingers and the anchor point. A proper grip, like the Mediterranean grip, and a stable anchor point will help you achieve excellent results while shooting.
The Mediterranean grip is the most common method used by archers. To hold the bow using this grip, place your index, middle, and ring fingers around the bowstring. Your index finger should be above the arrow, while your middle and ring fingers should be below. Make sure there’s enough space between each finger to avoid pinching the arrow. To protect your fingers and ensure a smooth release, consider using finger tabs which act as a barrier between your fingers and the bowstring.
Now let’s discuss the anchor point. The anchor point is the spot where you consistently draw the bowstring back to your face. This repetitive touch allows you to maintain accuracy and stability while shooting. To find your anchor point, draw the bowstring back while keeping your hand relaxed. You should come to a natural stop, usually the corner of your mouth or directly under your jawline. Rest your thumb under your jaw and allow your fingers to touch your cheek lightly. Each archer’s anchor point may vary slightly, so you should experiment to find the most comfortable and consistent position for yourself.
Remember to maintain a friendly tone and keep practicing. Over time, your technique will improve, leading to more accurate and consistent shots. By focusing on your fingers and the anchor point, you’ll create a solid foundation for your archery skills. Happy shooting!
The Role of Muscle Memory in Archery
When it comes to archery, muscle memory plays a significant role in mastering the art of holding the bow and shooting accurately. To develop this important skill, you need to practice your grip and establish a consistent grip technique.
As a friendly reminder, muscle memory refers to your body’s ability to remember specific movements and perform them effortlessly through repetition. In archery, this means being able to position your hand and fingers on the bow without consciously thinking about it each time you shoot.
To begin your journey in mastering muscle memory, start by finding a comfortable grip where your hand is relaxed and settled in a natural position. This grip allows for optimal control and stability while preventing unnecessary tension in your hand and arm. Make sure to maintain this grip consistently during each practice session, as it will help train your muscles to adopt this position automatically.
Don’t be disheartened if it takes some time for your muscle memory to develop; consistency and patience are key. Devote ample time to practice, setting up regular sessions to fine-tune your grip and shoot with precision. As you gradually see improvement in your shots, you’ll notice your hand automatically adopting the correct grip – that’s when you know your muscle memory is kicking in.
As you build your muscle memory in archery, remember that a friendly attitude towards practice and learning will make the process far more enjoyable. With dedication and a positive mindset, you’ll see improvement in your grip and shooting consistency, making you a more skilled archer in no time.
Understanding and Controlling Tension and Torque
When you’re holding your bow, you want to ensure that tension and torque are managed properly. This will increase your accuracy and consistency while shooting. Let’s discuss how to control tension and torque in your shooting technique.
Tension is the force applied by your bowstring against your fingers. Proper tension is key to accurate shooting. To control tension, keep your bow arm relaxed and straight. Make sure your fingers grip the bow lightly, allowing the bowstring to glide smoothly across your fingers as you release your shot. Greater control can be achieved by using proper finger placement on the bowstring and keeping a continuous pressure throughout the draw and release.
Hand torque, on the other hand, is the twisting force exerted by your hand on the bow handle. Too much hand torque can result in poor arrow flight and accuracy. To minimize hand torque, ensure that you are gripping the bow in the correct way. Your bow hand should be relaxed, and your knuckles should form a 45-degree angle to the bow handle. Create a V-shape with your thumb and index finger, and use the fleshy part of your thumb as a natural shelf for the bow to rest on.
Lastly, try practicing your shot execution to reduce torque caused by your release mechanism. Develop a consistent release technique, which not only allows the bowstring to depart cleanly but also helps in maintaining the correct follow-through and alignment.
By understanding and controlling tension and torque, your archery skills will improve, leading to more accurate and consistent shots. Remember to keep practicing and focusing on these aspects of your technique to achieve the desired results.
Nocking the Arrow: Technique and Tips
Before you begin, it’s crucial to learn the proper technique for nocking the arrow on your bow. A good nocking technique ensures accuracy and consistency in your shots. Let’s go through these steps you can follow to improve your nocking method.
First, place the arrow on the arrow shelf. Rest the arrow on your bow’s arrow shelf, which is usually found just above the grip. Make sure the arrow is sitting comfortably and securely on the shelf with the vanes facing away from the bow.
Next, focus on the nock. The nock is the small plastic or metal component at the end of the arrow, which is designed to clip onto the bow string. Align the nock with the bow string, making sure that the groove in the nock is facing the string.
Then, attach the nock to the string. Hold the arrow just below the nock, and gently press the nock onto the bow string. You should hear a quiet click when the nock is securely attached to the string. The arrow should be able to rest perpendicular to the bow string without your support.
Now, verify the nocking point. The nocking point is the spot on the bow string where the nock connects, allowing the arrow to release smoothly and accurately when you release the string. To find the correct nocking point, use a bow square and make sure that the bottom of the arrow nock is approximately 1/4 inch above square.
Lastly, double-check the alignment. Take a moment to ensure that your arrow is in a straight line with the bow string and is at a 90-degree angle to the arrow shelf. While maintaining this alignment, try not to touch the arrow with your fingers, as this could cause an imbalance that would affect your shot accuracy.
By following these tips and practicing consistently, you’ll quickly master the process of nocking your arrow and improve your overall shooting technique. Remember to remain patient, diligent, and friendly with yourself as you develop this important skill.
Drawing the Bow: Technique and Tips
When you’re ready to draw the bow, it’s essential to adopt the proper technique to ensure accuracy and prevent injury. Begin by establishing your stance with your feet shoulder-width apart, perpendicular to your target. Remember to keep a relaxed, comfortable posture to help maintain stability throughout your draw.
Hold the bow using a secure and comfortable grip. Your bow hand should be perpendicular to the ground, keeping your knuckles at a 45-degree angle. Avoid gripping the bow too tightly, as this can cause unwanted tension and reduce your accuracy.
As you start to draw the bow, focus on using your back muscles, primarily your rhomboids and lower trapezius. This helps to distribute the weight evenly and minimize strain on your arms and shoulders. Begin by raising your bow arm with a slight bend at the elbow, while simultaneously extending your drawing arm behind you.
When it comes to finding your ideal draw length, it’s important not to overextend. Your draw length is the distance from your bowstring when at full draw to the back of the bow. To find the proper draw length, have a friend measure the distance between your outstretched arms, fingertip to fingertip, while standing up straight. Then divide this number by 2.5 to achieve an approximate draw length that’s suitable for your body size.
Here are some additional tips to ensure a smooth and efficient draw:
- Keep your bow elbow slightly bent and relaxed to prevent hyperextension injuries.
- Maintain a strong anchor point on your face, such as the corner of your mouth or just below your cheekbone, to establish a consistent reference point.
- Use a consistent draw motion, aiming to keep your draw arm parallel to the ground as you pull back the bowstring.
- Avoid allowing your hand to rest against your face during your draw to prevent unwanted movement or tension.
- Close your non-dominant eye, or use a bow sight if necessary, to improve your focus and eliminate distractions.
With practice and attention to these details, your draw technique will improve, resulting in better control, consistency, and accuracy on the range.
Accurate Shooting: Tips and Techniques
When it comes to accurate shooting, a proper grip on your bow is crucial. To improve your shooting accuracy, follow these friendly tips and techniques.
First, establish a relaxed grip when holding your bow. Firmly grasp the bow handle with your non-dominant hand while leaving some space between your palm and the bow’s grip. A tense grip may lead to torquing, decreasing your accuracy.
Make sure your bow arm’s elbow is slightly bent and pointing outward. This position reduces the chances of your bowstring hitting your forearm, which can affect your aim.
Next, pay attention to your anchor point. An anchor point is the position on your face where you consistently draw the bowstring back to for stability. Common points include the corner of your mouth, jawline, or cheek. By maintaining a consistent anchor point, you’ll be better able to focus on your aim.
Your stance is an essential aspect of accurate shooting, too. Stand with your feet shoulder-width apart, with your body perpendicular to your target. Distribute your weight evenly on both feet, and lean slightly forward at the waist. This position helps with your balance, ensuring better performance.
Remember to breathe properly when aiming. Inhale deeply before drawing your bowstring, and exhale slowly as you settle into your aim. This will help steady your mind and body, greatly improving your accuracy.
Finally, focus on your follow-through. After releasing the arrow, maintain your form and keep your bow arm extended until the arrow hits the target. Doing so helps ensure consistent and accurate shooting.
By incorporating these tips and techniques into your routine, you will likely see an improvement in your shooting accuracy and overall skill. Keep practicing and refining your techniques, and enjoy the art of archery!
The Role of the Riser and Pressure Point
When shooting, it’s essential to understand the importance of the riser and pressure point in holding your bow correctly. They play a significant role in improving your accuracy and comfort while shooting.
The riser is the central part of the bow that connects the limbs. It’s usually made of wood, metal, carbon, or a combination of these materials. When gripping the riser, you should find a position where your hand feels naturally comfortable. A relaxed grip will help you maintain consistent shots and better control of the bow. Remember to keep your fingers loose around the riser and avoid tensing up.
The pressure point is where the knuckles of your hand meet the riser. It’s crucial that this area remains consistent and stable. To find your pressure point, hold the bow with an open hand and gently close your fingers around the riser. The point where your hand naturally settles on the riser should be your pressure point. Your pressure point should be:
- Located at the base of your thumb
- Above or below the arrow’s path depending on whether you use a shelf or an elevated rest
- Aiming at the center of the riser
To improve your shooting, you want to maintain a steady and consistent pressure point throughout your shots. This means you shouldn’t adjust your grip between shots, ensuring a predictable trajectory for your arrow. Practicing your grip and becoming familiar with your pressure point will undoubtedly improve your skills as an archer over time.
So remember, maintaining a comfortable grip on the riser and a consistent pressure point will significantly enhance your shooting accuracy. As a friendly reminder, stay relaxed and confident while gripping your bow, allowing for a smoother and more enjoyable experience.
The Lifeline, Wrist Sling, and Hand Position
When it comes to archery, maintaining a proper grip on your bow is essential to ensure accuracy and consistency in your shots. In this section, we’ll discuss the aspects of the lifeline, wrist sling, and hand placement.
The lifeline refers to the crease in your palm that runs from the base of your thumb to your wrist. To establish an ideal archer’s grip, place the bow handle directly on your lifeline. The pressure should be on the meaty part of your hand, just below the thumb. Remember to keep your fingers relaxed, as gripping the bow too tightly can lead to less accurate shots.
A wrist sling is a useful accessory that helps you maintain a relaxed grip on the bow. By attaching to your bow handle and wrapping around your wrist, it provides support without constraining your hand movement. To use a wrist sling effectively, adjust it so that it fits snugly around your wrist without feeling too tight. This will allow you to maintain a light grip on the bow while still having the support you need.
Proper hand placement is another key element in achieving consistent shots. Your hand should be at a 45-degree angle, with your fingers resting lightly on the handle and your thumb pointing down towards the ground. This position helps to create a more natural and relaxed grip, reducing the chances of torqueing the bow.
Here are a few tips to remember for optimal grip:
- Align the bow handle with your lifeline
- Keep your fingers relaxed, not gripping the handle tightly
- Use a wrist sling for additional support without constraining hand movement
- Aim for a 45-degree angle in hand placement with thumb pointing downward
By focusing on these aspects of your grip, you will improve your accuracy and consistency in archery. Take the time to practice and develop these proper hand positions, they will surely enhance your shooting performance.
The Effects of Trigger and Mechanical Release
When shooting with a bow, using a trigger or a mechanical release can significantly impact your shooting experience. Let’s explore these two factors and understand how they can change your shooting technique.
The trigger in archery releases is often used in compound bows and helps ensure a consistent, smooth release of the arrow. As you pull back the bowstring, the trigger aids you in maintaining the tension needed for a perfect shot. Once you are ready to release, simply apply gentle pressure to the trigger, resulting in a clean and precise shot. Using a trigger release enables you to focus more on your aim, taking the stress off of your fingers and reducing the chances of a shaky release.
Now, let’s discuss the mechanical release. This device is specially designed to release the bowstring with consistent pressure and reduce the strain on your fingers. Mechanical releases are available in various styles, such as wrist straps with a trigger, thumb releases, and back tension releases. By using a mechanical release, you will experience improved accuracy and comfort while shooting.
- Wrist strap releases: These are the most common type of mechanical release and are perfect for beginners. They strap onto your wrist, and you use your index finger to activate the release. This type distributes the weight across your wrist, which helps to reduce fatigue during longer shooting sessions.
- Thumb releases: These are handheld releases that require you to use your thumb to activate the trigger. They offer a greater level of control, which can lead to enhanced accuracy, particularly for experienced archers.
- Back tension releases: Also known as hinge releases, these devices engage upon reaching a certain tension level while pulling back the bowstring. The back tension releases do not have a trigger; instead, they automatically release the bowstring when you reach the optimal tension.
Choosing the right type of release can enhance your consistency and accuracy, leading to a more enjoyable shooting experience. Remember that selecting the best release for you is a personal process, as what works for another archer may not necessarily work for you. Don’t be afraid to experiment with various types and find your ideal fit. Happy shooting!
Importance of Follow Through in Archery
When you’re learning the art of archery, one crucial aspect you might overlook is the importance of follow through in your shot. As a friendly reminder, follow through refers to the motion of your shooting hand, bow arm, and body after releasing the arrow. It’s a critical element to ensure accuracy, consistency, and fluidity in your shots.
When practicing your follow through, it’s essential to maintain your form after releasing the arrow. Keep your shooting hand relaxed and let it naturally move backward, close to your ear. This motion will propel the bow forward and create a smooth, controlled shot. Avoid abrupt movements and tense muscles, as these can hinder the arrow’s trajectory and lead to inconsistencies in your form.
Consistency is a key factor in improving your archery skills. By focusing on your follow through, you’ll foster a reliable and repeatable technique, resulting in closer groupings and higher scores. Remember that practice makes perfect, so don’t be discouraged if it takes time to develop this skill. Keep paying attention to your shooting hand, and soon you’ll start to feel the fluidity and control of an accomplished archer.
Lastly, the follow through is more than just the final step in shooting an arrow. It’s a reflection of your overall form and technique. A good follow through means you’ve executed each step of the shot process correctly: drawing the bow, anchoring, aiming, and finally releasing the arrow. Achieving a proper follow through is both a testament to your skill and a visual representation of your hard work and dedication to the art of archery.
Remember to always focus on your follow through to ensure a smooth, accurate, and consistent performance. In doing so, you’re setting yourself up for success and continuous improvement as an archer.
Tips for Improved Control and Consistency in Archery
Having good control and consistency is crucial in archery, especially when holding the bow. Here are some tips to help you improve in these areas:
Firstly, practice a proper and relaxed grip. Hold the bow lightly in your hand instead of squeezing it tightly. This helps in avoiding muscle tension and promotes a smoother release. Make sure your fingers are positioned correctly on the bow handle. For maximum control, use a wrist sling, which allows you to maintain a relaxed grip while still securing the bow.
Next, focus on your bow arm’s positioning. Keeping your arm straight and slightly bent at the elbow reduces strain and adds stability. Align your bow arm’s shoulder, allowing it to be in line with the arrow and target. This positioning helps achieve better accuracy and control in each shot.
Additionally, pay attention to the placement of your draw hand. Drawing the bow should involve minimal finger pressure and more back tension. This can be achieved by using your back muscles, particularly the rhomboid muscles, to pull the bowstring. This technique allows for more consistent releases and enhances overall control.
Breathing techniques are also vital in archery. Take a deep breath before drawing the bow, and exhale slowly as you aim. This rhythmic pattern helps in relaxing your body and steadying your aim, ensuring more controlled and consistent shots.
Lastly, practice regularly to improve your muscle memory and maintain consistency in your shots. Remember, progress in control and consistency takes time and patience. Maintain a growth mindset and embrace the learning process as you work towards becoming a better archer.
Archery in Hunting: How Proper Grip Affects Performance
Hunting with a bow requires skill, precision, and proper technique to ensure success. One of the most essential aspects of archery in hunting is how you hold the bow. Your grip plays a crucial role in your performance and results. Maintaining a proper grip will provide you with better support and increase your chances of hitting your target.
To achieve an effective grip, start by positioning your hand on the bow’s handle. Your hand should be placed at a 45-degree angle, with your fingers pointing downwards. This relaxed angle minimizes tension in your hand and provides better support for the shot. Ensure that your index finger’s knuckle is resting on the throat of the bow while your other fingers should wrap around the handle naturally. Maintain a slight gap between your palm and the bow’s handle to avoid torque when you shoot.
When drawing your bow, focus on the tension in your hand. Squeezing the handle tightly can cause the bow to twist and result in less accurate shots. Instead, try to hold the bow with a relaxed hand while maintaining control of the bow’s movements. Your fingers should remain gently wrapped around the handle, with the bow’s weight resting on the muscles between your thumb and index finger.
Consistent grip pressure is also important for successful shots during hunting. Developing a uniform grip pressure allows you to shoot more accurately and with greater control. Practice maintaining consistent grip pressure by paying attention to your hand during each shot. The more consistent your grip, the better your performance will be in the field.
Remember, practice is vital to improving your grip and overall archery skills in hunting. Devote time to honing your form and adjusting your grip as needed. A strong foundation in proper grip technique will give you the support and confidence you need to excel in your hunting adventures.
Improving Your Grip Techniques with Practice
To enhance your grip techniques, it’s essential to practice regularly. Start by ensuring you have a comfortable and consistent grip on your bow. Hold the bow with your non-dominant hand, keeping your fingers relaxed and your knuckles angled at about 45 degrees. This will help distribute the pressure evenly across your hand and prevent any unnecessary tension.
Remember that a relaxed grip is crucial for accurate shooting. Instead of squeezing the bow tightly, let it rest naturally in your hand. To maintain this relaxed grip, support your bow with a wrist sling or finger sling, especially during the shot execution.
While practicing your grip, pay close attention to your hand position and develop a routine that works best for you. It’s beneficial to try different hand placements and grip pressures to find the ideal balance. Consistency is key, so once you’ve found a suitable grip, stick to it, and make it a habit every time you shoot.
To further improve, consider doing these activities:
-
Regular practice: Schedule time for consistent practice sessions. The more you practice your grip technique, the better you’ll become.
-
Watch experienced archers: Observe professional archers and analyze their grip techniques. You can learn a lot from their success and apply these techniques to your shooting style.
-
Experiment with grip accessories: Try using various grip accessories to find the most comfortable and effective grip for you. Custom grips and gloves can help you maintain a consistent hand position and reduce bow torque.
By following these tips and dedicating yourself to regular practice, your grip techniques will significantly improve over time. With the right grip and a consistent practice routine, you’ll soon be shooting with increased accuracy and confidence.
Frequently Asked Questions
What is the proper grip for a compound bow?
To hold a compound bow, place your hand in the bow’s grip so that the contact points are at the base of your thumb and the pad where your little finger resides. Keep your fingers relaxed and avoid grabbing the bow tightly. This relaxed grip will help minimize torque and improve your accuracy.
Which hand should you use to hold the bow?
The choice of hand depends on your dominant eye. If you’re right-eye dominant, hold the bow with your left hand and pull the string with your right hand. Conversely, if you’re left-eye dominant, hold the bow with your right hand and pull the string with your left hand.
How do you hold a bow and arrow for right-handed archers?
For right-handed archers, hold the bow with your left hand, keeping your arm straight but not locked. Place your fingers on the bow grip as described above and maintain a relaxed grip. The arrow should be placed on the arrow rest with nocking point aligned to the bowstring. Use your right hand to pull back the string.
What is the correct way to hold a bow and arrow for left-handed archers?
For left-handed archers, hold the bow with your right hand, keeping your arm straight but not locked. Place your fingers on the bow grip and maintain a relaxed grip. Position the arrow on the arrow rest with the nocking point aligned to the bowstring. Use your left hand to pull back the string.
What are some common mistakes when holding a bow?
Some common bow-holding mistakes include gripping the bow too tightly, placing your fingers incorrectly on the bow grip, and locking your bow arm. Avoid these mistakes by maintaining a relaxed grip, correct finger placement, and a slightly bent bow arm to allow for better shock absorption and stability.
How can I improve my bow-holding technique for better accuracy?
Improving your bow-holding technique involves practicing a relaxed grip, proper finger placement, and keeping your bow arm slightly bent. Try to focus on maintaining a consistent grip and bow arm position during every shot. Use a checklist to identify any issues with your current technique, and consider seeking advice from an experienced archer or a coach to help you make adjustments.
