

Compound bows are perfect for practicing archery or hunting animals out in the wild. However, professional compound bows can be obscenely expensive. If you want to own a compound bow without wasting too much of your hard-earned money on it, then you could make a homemade compound bow with readily available and cheap materials. Not only will this project help you save a ton of money, but it also tests your creativity.
In this article, you will learn how to build a compound bow from scratch. Follow these steps, and you will have your own bow in no time!
Materials Needed
Before you begin the project, it is best to gather all the materials you will need to finish it. You can get all the materials that you need from a local hardware store on a shoestring budget or even an e-commerce platform if you don’t find the materials locally. Here is what you will need.
For Bow
- Two thick pieces of PVC (ex. Electrical conduit)
- A piece of white PVC slightly larger than the thick one
- A heat gun
- A block of wood
For String and Cables
- A 5/8″ Superstrut channel with 2, 10′ sections
- Coarse Threads
- Compression spring
- Superstrut spring nuts
- A steel bar with 7″ length, ¾” width, and ½” thickness
- Superstrut corner brackets
- Eyebolts
- Grade 8 hex bolts (handles and jig posts)
Once you’ve got everything you need for the DIY compound bow project, you can begin the real work.
Making the Bow
Step 1: Grab a piece of PVC and heat the entire tube using a heat gun, until the tube becomes hot and squishy. (1)
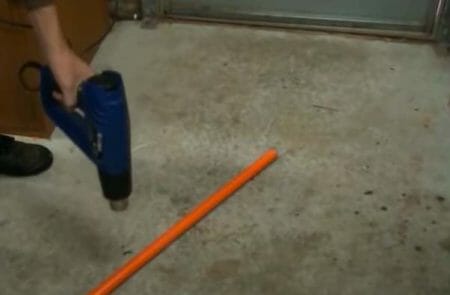
Step 2: Place the heated tube on a flat surface, and press a large block of wood on top of the tube to flatten it. Flattening it would be easier now because the tube is hot and volatile. Apply extra pressure on the ends to make them flatter than the mid-section.

Step 3: Heat the flattest ends again using the gun, and drill a hole through the ends. Bend the end-section inward to give it a shape of a proper bow. Use a glove while giving the tube a curve at the end.
Step 4: Repeat the same exercise with another similar PVC tube, but instead of putting a hole at the end, put a notch.

Step 5: Now take some PVC, larger than the other two tubes, but not too large for the tubes not to pass through completely. Heat each end of the large PVC, until it’s squishy.

Step 6: Now, grab the two smaller PVC tubes (the limbs of the bow), and push them inside the larger PVC from both ends. Push it just halfway through. Finish off by attaching an arrow rest. You can make the arrow rest using a small piece of PVC. Simply heat it, and bend it to a right angle. Then use duct tape to attach it to the bow, or if you opt to buy one, then, you may check this guide to the best arrow rest in the market nowadays.
After making the Bowstring (which we’ll discuss next), pass it through the holes and the notch to finish making the bow.
Making the Wire
Assemble
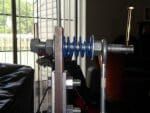
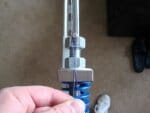
You’d be first required to assemble the parts that you have gathered. Begin by adjusting the eye bolts’ height. The aim is to keep the All-thread level when the jig posts are under tension. You would then be required to make a hole through the all-thread and nuts using a driller and fit the bolts by tapping them. Precision while drilling the holes in the center may require some attention.
Put Grade 8 hex bolts in place, and move on to grinding a flat spot on the other ends of all the threads. Make a hole on the flat spot for the screw, the handle one.
Clamp the chunks of steel bars that we collected earlier between two corner brackets. Drill them simultaneously, if possible.
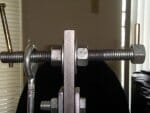
In one of the corner brackets, where there would be two existing holes, drill a big hole between them. It should be large enough for 3/8″ eye bolts. Do the same with another corner bracket, but this time, make a hole large enough for the 1″ coarse thread and ½” bolts.
Then finish by adjusting the eyebolts in such a way that when the string tensions, there is no excessive binding.
Tensioning the String
Now comes the part where you would need to put tension on the bow’s string.
One of the easiest methods of doing that is to calibrate the non-spring jig head in such a way that it does all the pulling work, as well as compression spring’s compressing. You would then be able to use this spring as a scale.
For calibrating the spring, you’d have to attach a scale that could weigh things up to 300 lbs.
With a spring-less jig post, begin tensioning the spring. You could observe the progress through the scale.
At 100 lbs, take measurements of the spring. Keep a record of all the measurements you take.
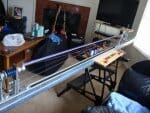
Upon reaching your poundage, use a jig that you built that fits between the thick steel bar. Continue tightening the jig. Repeat it until the scale hits the 300 lbs mark, and then measure. You can use the recorded measurements if you ever need to recalibrate. You also need to lubricate the mechanism regularly.
String Building Formula
You can use an easy formula to ascertain the precise numbers of twists. It also helps in determining the finished length of the string.
The finished length of the string x .75 = The total number of the twists.
The total number of the twists x .012 + the finished length of the string = The initial setting of the jig post.
Building the String
The next thing on the agenda is to build the string. For ease, you can build them with the post’s top loops without needing the spring. Follow the steps to build the strings.
- Measure the jig from the outside of both the jig posts. Tie a tag end to prevent the strands from overlapping on the jig post.
- Cross the tag ends on the post, put them through the middle point of the string bundles.
- Use the tag-end method to complete the end loops. Now begin separating the bundles in both ways evenly. You can use golf tees for this.
- Wrap a piece of string material around 50% of the first color, then remove the excess wax by pulling the looped serving up. With this, you can prevent colors from mixing. Repeat the exercise for each half for all color bundles.
- You would then have to tension the string to 300 lbs for approximately twenty minutes. Now, ease the string’s tension, and place the golf tees, forming the “X” on each of the ends. Now twist the string. Place the string scrap piece between the color bundles, and separate the strands by going from one end to the other.
- Now, you can remove the golf tees and reduce the tension to 100 lbs. Take measurement.
- Burnish the string by wrapping a piece of serving around the string twice, and cover the string up and down to make the string round. Do it 4-5 times.
- After the stretching period, ease the tension on the jig. Then, remove the string. Keep it away for about four hours to give it some time to relax. In the meantime, ensure the end loops are secured so they don’t untwist.
- After four hours, place the string back on the jig, and take the tension to 100 lbs. Keep twisting and undoing until the final length of you measured out is reached.
- When the final length is produced, take tension to 300 lbs, and carefully serve the string.
- Now, remove the string from the jig, and let it relax for twelve hours.
- Put it on the jig again, and measure to 100 lbs. Adjust the apparatus until the final length of your choice is achieved, then secure the loops and install the string.
Building a Split-Yoke Cable

At this point, you should build a splint-yoke cable. For this, place the first color. A lot of the steps involved in this one would be similar to that of what we did while making the string. Use the tag ends to finish the loop. Do the same with the second color. Make sure to finish this one on the same post as the last color.
Use some string material. Now by bringing both the bundles together, you can finish off with the loop at the other end. Now you have 3 finished loops with you. Run it inside the bundle up and down, and the jig post to the post’s rear.
There must be a section protruding from the bottom, loop it over the top and right through the middle.

Now, take the part that’s coming from the top, and run it under and again, right through the middle. Tighten the two until they connect at the post’s rear. You can also make 2 colors. For this, you would need a 24″ piece of string of material of each of the colors, and loop the piece together in the middle.
From here on out, the steps involved in the construction remain pretty much the same as the string. You need to separate using golf tees and work on de-waxing the string. All the remaining steps are the same as above, down to burnishing the cable and then serving. (2)
You may want to check the video below;
There you go! We hope you’re able to make one for yourself through this guide. You may also want to check this guide on how to store a compound bow after you’ve used it. Until our next article!
References
(1) PVC – https://www.britannica.com/science/polyvinyl-chloride
(2) construction – https://www.mlit.go.jp/sogoseisaku/1_6_hf_000038.html
