
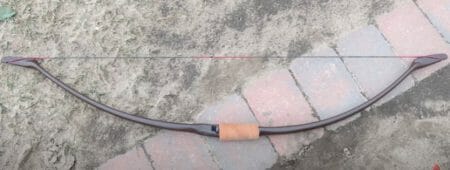
Do you love hunting but find it restrictively expensive to buy a bow from a pro shop? Well, we found two cheap methods for you to make a hunting bow instead. You only need a handful of do-it-yourself tools and to choose between a PVC pipe hunting bow or a forest wood bow.
Bonus: you will also learn how to make a set of arrows for your bow
Without further ado, let’s discuss how to make a hunting bow.
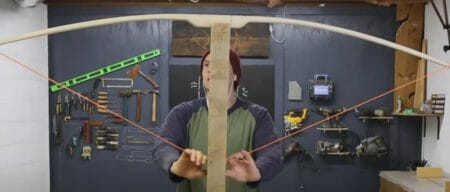
Method 1: Making a Hunting Bow from PVC
PVC is a highly adaptable material. It’s inexpensive, simple to work with, and readily available at your local home improvement store in enormous quantities. Now I’ll teach you how to make an effective bow out of standard PVC pipes.
Step 1: Gather Tools and Supplies
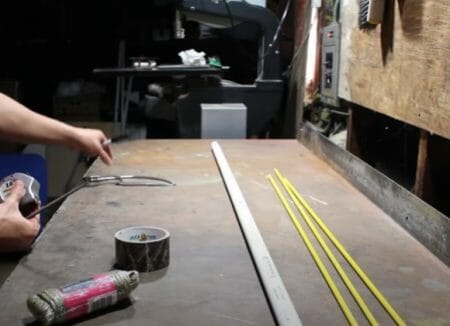
You can make a PVC bow with several different tools rather than the ones we mention, but make sure you follow all safety measures. Below is a detailed list:
- Main PVC pipe – at least 62 inches in length and 3/4 inches in diameter
- 2nd pipe – At least 12 inch PVC pipe in length and 1 inch in diameter
- 3rd pipe – A 2 to 4 inches PVC pipe cut and 1/2 inch in diameter pipe
- PVC pipe endcaps, with 2–4 inches (5.1–10.2 cm) cuts (optional)
- 550 paracord, with 62 inches (160 cm) long cut, 12 inches (1.3 cm) thick
- Saw
- Rubber Mallet
- Paint
- Tape Measure
- Electrical Tape
Note: The PVC pipe sizes are measured in diameter as shown in the three different pipes that you have to prepare from above.
Step 2: Cut the Pipes

If you didn’t buy PVC fiberglass pipes that are already in proper lengths (sometimes you can have them cut for you in hardware stores), you would have to cut them to the following measurements:
Main PVC Pipe (Bow Body)
Grab the long PVC pipe that you have and measure it to make sure that it exceeds the desired length. Mark the area where it measures 62 inches and cut the pipe with a PVC pipe cutter. (1)
Sub-Pipes (Support System of the Bow)
Get the 2nd pipe and measure it. If it is not 12 inches long, mark where it ends at this length. Cut and remove the rest of the pipe.
Lastly, take the 1/2 inch (diameter) pipe size and cut a portion of 4 inches (recommended) in length only.
A hacksaw will suffice if you don’t have a PVC cutter. If it forms ragged edges on the pipes, use sandpaper to smooth them off.
Step 3: Link the PVC Pipes

Insert one 4 inch PVC pipe first into the main bow pipe. To hammer it in, use a rubber mallet. As it will be a close fit, you might have to exert a lot of force. Push it in all the way until the tops of both pipes are United. After the first one goes in, repeat with the remaining four “on the other side of the pipe. These portions will help strengthen the bow’s tips, which will be where you’ll connect your paracord.
If you don’t have a mallet, a piece of wood can effectively distribute the force of your hammer and lessen the risk of the PVC pipes splitting.
Step 4: Make the Hand Grip
On one side, cut the 1″ segment of PVC pipe down the middle. It will be easy to put it over the main bow this way. Bind it with electrical tape once you’ve cut it out and set it in the center of the main bow. To make a strong coating, consider layering tape.
Face the side of the bow that has the cut on the exterior away from the string. This is vital since the cut may open and close when you bend the bow during use. The cut may pinch your fingers or shred the tape if it’s on the wrong side.
Step 5: Use Scissors to Cut the Paracord
You’ll need around 62 inches of paracord to wrap around your bow. It’s a few inches longer than you require, but you’ll lose some length as you connect the paracord to the bow. Count out 62 inches, and using sharp scissors, gently cut the paracord straight through.
You may also seal the ends with a flame. Gently burn each end of the paracord with a lighter or a match—this way, the ends of the paracord will not easily fray.
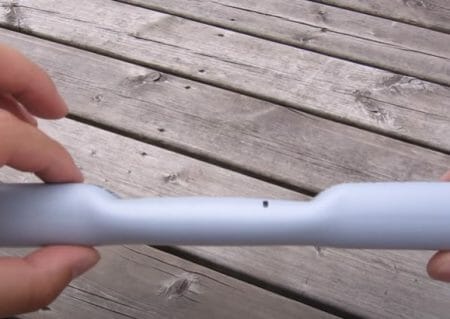
Step 6: Make a Notch on the Bow’s Ends

Make a 1/2-inch cut with a hacksaw or other saw of your preference. Next, create a wide notch with a 70-degree angle. Then, point the notch towards the back of the bow to pull the paracord in the same direction. The paracord will stay tight at this angle. Furthermore, a 1/2 inch paracord fits securely in the groove and does not slip out.
Step 7: Tie a Knot in Each Groove with the Cord

Begin at one end and, once you’ve made a tight knot, pull the string up to the other end and make a second knot. The string should be stiff enough that you can tug it with your finger, and it will bounce right back.
Step 8: Put on the PVC Caps
Consider using PVC caps to help finalize the appearance of your bow and safeguard the paracord on each end. The 4-inch caps should fit appropriately on every end. It would be best if you don’t glue the caps on because you might need to remove them if a string fractures and you need to restring the bow.
Step 9: Start Painting the Bow
If you want to make your bow more colorful, below is a helpful guide for you:
- Consider using spray paint.
- Spray immediately onto the bow after placing it on a piece of cardboard outside.
- Disconnect the paracord and PVC caps before painting, and let the paint dry completely before using your bow.
Method 2: How to Make a Good Bow Out of Wood
Maybe you’re an archer or just a hunter who prefers hand-forged gear. Bear in mind that making a hunting bow takes a lot of time and effort. Nevertheless, this guide will teach you how to make your wooden bow. Below is the step-by-step bow making instructions to help you out.
And if you’d like to make a recurve bow with wood also, you may check our guide on how to make a wooden recurve bow.
Step 1: The Supplies and Tools Needed
You may utilize alternative tools instead of the listed materials to make a wood bow, but make sure to practice safe procedures. The following is a list of items you should get:
- Handaxe
- Machete
- Carpenters Pencil
- Tape Measure
- Draw Knife
- Straight Edge
- Wood Rasp
- Bow String
Step 2: Properly Choose the Appropriate Tree
Making a hunting bow from almost any tree is possible; however, there are some characteristics to search for. Choose a tree with a diameter of about 4 inches, which is smooth and straight.
Step 3: Cutting the Wood
You can produce six or seven bow staves from an 8-inch tree. Allow extra space at the end of each stave to chop off about 6 inches where the wood may have fractures. A 68-inch bow, for example, requires at least a 6-foot piece of wood. Maintain the stave about 1 inch wide and 1 inch thick from tip to tip. Retain the bark on the wood to prevent cracking while it dries.
Step 4: Remove the Bark
A draw knife is the most convenient tool for removing bark. It is a hand tool used in woodworking that is useful for peeling bark and scraping off edges. Whenever you work with a drawknife, use caution and consider using gloves to safeguard your hands.
Remember to only taper down the limb about 19 inches from the middle to end with 12-inch-wide tips.
Step 5: Examine the Wood

Search for the finest and smoothest side of the wood that will match the bow’s proper measurements of 68 inches in length. Look for solid parts that don’t exhibit any indications of corrosion or instability. Wood can be polished out, but there is little you can do about wood that has begun to deteriorate. Once you’ve found a nice spot, mark it with a thick carpenter’s pencil. (2)
Step 6: Start Cutting the Wood
Cut the ends with a hatchet and a machete. The limbs should be about 1/2 inch thick near the edges, and the 4-6 inch handle part in the middle should be around 2 inches thick. Use a wood rasp with small teeth to shape, polish out the wood, and help from the limbs to the desired thickness.
Step 7: Bend the Limbs
Once you complete forming the bow, lay the limbs on the ground and apply light pressure to the center with your foot. Ensure that the limb bends equally. Putting pressure should be done with caution and at a steady pace. You should test the bow’s flexibility without breaking it.
Examine the bow first to see if you can bend it into a semicircle. Scrape away more wood to loosen the limb if it refuses to bend easily.
Step 8: Make the Notches

You must cut notches about 1 inch deep at both ends of the bow limb to retain the string or paracord. Align the notches towards you and away from the bow’s front. This will keep the string secure while you use the bow.
Step 9: Insert the String
Through the notches, tie a string around each end. Pull the string down to the other side after tying off one end. Ensure the string is tight enough that it bounces back when you pull it.
Step 10: Try Out your New Bow
Arrows are available for purchase, or you can make them yourself. When utilizing your new bow, be alert and cautious at all times.
How to Make a Good Bow and Arrow (Easy Steps)?
After you’ve completed your bow hunting, it’s best to move on to the hunting bow arrow, as a bow isn’t complete without one. Crafting wooden arrows in the traditional method is a simple and effective process. Below is a step-by-step guide on how to make a bow and arrow for hunting:
Step 1: Purchase a set of matched wooden shafts after determining the correct diameter. The diameter of the shaft is mostly determined by the weight of your bow. To determine the proper diameter, consult a spine chart.
Step 2: Clean any debris from the shafts by wiping them off with acetone. Then polish them gently.
Step 3: Trim one end of the shaft to fit your nock with the tapering tool. This apparatus looks like an enormous pencil sharpener. You can make both 5, and 11 degree tapers with taper tools. For the nock, use the 11-degree taper.
Step 4: To determine any bends, spin the shaft in an arrow spinner. Place the arrow firmly on a flat surface and slide the body of a screwdriver over it from end to end to fix any curves. Repeat until the shaft of the spinner seems straight. This is the most crucial step, so make sure you get it correctly before continuing.
Step 5: You should polish your shafts with acrylic floor covering to protect them. Allow three to four hours for drying before softly sanding. Apply for a total of three coats.
Step 6: Install a nock to the tapered end of the shaft with clear fletching cement or quick adhesive. Then connect three or four precut feathers with a fletching jig and let dry.
Step 7: Bring your bow back and place the uncut arrow on it. Make a mark one inch in front of the bow handle with the arrow. Cut the arrow at the mark, taper the cut end, and use hot glue or epoxy to attach your point or broadhead. Finally, allow drying.
Those are our seven (7) quick steps on how to make a bow and arrow, and below are other article guides that you can check.
References
(1) PVC – https://www.britannica.com/science/polyvinyl-chloride
(2) corrosion – https://www.sciencedirect.com/topics/engineering/corrosion
