

You may be new to archery, but you want to fire the most successful shots you can, right? To do that, you must understand a little archery concept known as draw length. This is the basis on choosing your equipment as well as prepping your bow for a day of firing.
To measure the draw length of your bow, you want to start at full draw. Then, go from the grip’s pivot in a perpendicular direction to the string’s nocking point. Add 1.75 inches to your total and you should have your draw length.
If some of those terms, like full draw and nocking point, have you confused, don’t worry. In this full guide, we strive to give you as much information as possible about draw length, including definitions for the above terms.
By the time you’re done a reading, you should know how to measure your bow’s draw length confidently and accurately.
What Is Draw Length?
Before we can even begin discussing how to measure the draw length, you have to have an understanding of what draw length is.
The draw length of an archery bow is simply how far you can pull back on the bow before you feel resistance.
Your draw length should be about as long as you are in inches. If that doesn’t quite make sense, then make sure you read on to our section about how to measure your bow’s draw length. We’ll elaborate more on other methods to determine the draw length later.
For now, we will say that some bows include mechanical systems that put a limit on how far the draw length can go.
This is why measuring the draw length is so important
There are many reasons why knowing the draw length is important.
The first is accuracy. Whether you’re a beginner or a seasoned pro, everyone wants to be as accurate as possible when firing a bow.
Yet if you were to improperly calculate the draw length, be it too big or too small, your accuracy could suffer.
To avoid underdraing and overdrawing
Underdrawing a bow, while it doesn’t happen often, is possible. This is when you draw the bow out much shorter than where you need it to be. This can happen to first-timers and other fresh beginners who don’t quite grasp the importance of draw length.
If you’ve improperly measured your draw length, then you could also underdraw the bow without knowing you’re doing something wrong.
Well, that is, until you fire your first arrow. Since the bow isn’t drawn to its full potential, accuracy will of course suffer. Not only that, but we can’t imagine the bow will travel very far when it’s underdrawn, either.
If you can underdraw your bow, then you can certainly overdraw it, too. This isn’t easy depending on which type of bow you have, but it is possible. If it’s a compound bow we’re talking about (more on compound bows later in this guide), the bow’s mechanical stop often prevents you from pulling the draw back too far. Trying to push beyond the stop will give you resistance.
Not every bow has a mechanical stop, giving you more room to overdraw your bow. Don’t be fooled, as this isn’t a good thing. Overdrawing, much like underdrawing, will negatively impact your shooting accuracy.
While you will certainly be able to shoot your arrow a further distance by overdrawing the bow, it’s still not a recommended practice. Instead, what you’re aiming for with your draw length is consistency.
Overdrawing and underdrawing are not conducive to consistency because they are both technically shooting errors. Your positioning and technique will likely be negatively skewed by an underdrawn or overdrawn bow.
By underdrawing, you have to accommodate for less bow length to shoot, probably compressing your body somewhat. When the bow is overdrawn, you’re likely overstretching to accommodate for the excess draw length. Both can result in injuries.
Finally, our final reason why the correct draw length matters has to do with the condition of your bow. It’s no secret that archery bows are not inexpensive. Sure, you could get one starting at $100, but it’s often flimsy and cheap. If you’ve spent $500 to $1,000+ on your bow, then you’re going to want to treat it with the utmost respect and care.
While underdrawing isn’t likely to cause serious damage, overdrawing your bow could. This is especially true if your technique is wrong too many times. It would be very unfortunate to snap your bow in half because you’re overexerting to make up for a bow length that’s too long.
What about Full Draw? What Does That Mean?
In the intro, we briefly touched on a concept known as full draw. Let’s define that now. Full draw is the correct positioning of your bow. It’s a feature found in compound bows and refers to the mechanical stop we discussed in the section prior. That mechanical stop operates to prevent you from overdrawing (in most instances) and instead guides you towards getting a full draw. Do keep in mind that the mechanical stop wouldn’t prevent you from underdrawing.
Many archers with years of experience mention how full draw is a feeling almost more than it’s a concept. Once you get more familiar with your bow and understand your draw length, getting to full draw will become more intuitive.
A Quick Anatomy of an Archery Bow
To help you gain a better understanding of the importance of a bow’s draw length, we figured it’d be best to cover the anatomy of the average archery bow.
Here you’ll see a diagram of a recurve bow. A recurve bow is one that has a slight curve on either side of the limbs. This curvature allows for you to achieve faster shots that can travel further compared to a simple bow with limbs that don’t curve.
Let’s discuss the diagram in more depth now. There are string nocks on both the top and bottom of the bow. In between these nocks is where your bow string will go. Towards the center of the string is the nock point. As you might recall from the intro of this guide, we mentioned the nock point then. Let’s elaborate on it more now.
The nock point is where you fit the arrow’s nock before you begin firing. You can’t miss it since it has a certain thickness and thread material. Beneath the nock point you’ll find the center string serving on many bows. This can reduce abrasion, especially near the nock point.
The bow’s sight allows you to get a visual on your target. You can adjust the sight to your liking with screws. The more distance you need, the more you’ll have to configure your sight to match.
When you set your arrow, the clicker will keep it in place. This saves you time and effort that you can in turn use towards shooting better. The plunger goes hand-in-hand with the clicker, as it controls the angle and direction of the arrow once it’s fired.
How to Measure Draw Length
At the beginning of this guide, we went over one method of measuring draw length, but there are several others. Let’s discuss these in more depth now.
Grip to Nock Method (AMO Method)
One method you can use to determine the draw length of your bow is the grip to nock method. This is the way the Archery Trade Association, once known as the Archery Manufacturers and Merchants Organization, measures draw length. For that reason, it’s worth knowing.
You might see this referred to as the AMO method, AMO standing for the former name of the Archery Trade Association. Regardless, you want to track the distance from the bow grip’s pivot point to its nock.
You want to start at the grip’s pivot point, which is also called its throat. To find this, look at its back. The furthest portion it goes out is where the grip’s pivot point is. From that point, measure out to the nock point where your arrow sits. This calculation may be referred to as the true draw length in some circles. Many archers regard this length as outdated.
Okay, so you can’t just measure from the grip’s pivot point to the nock point and call it good. You also have to tack on 1.75 to whatever your measurement is. This will give you the AMO draw length.
Arm Span Method
If the AMO draw length method seemed a bit complicated, that’s because it is. Luckily, there is a much easier way to go about calculating your bow’s draw length. It’s called the arm span method.
If you don’t already know it, measure your own arm span. You want to put your arms out fully on either side of your body, extending your fingers out. Avoid straining or stretching your muscles or you’ll skew the measurement.
Obviously, you cannot measure your own arm span, so make sure you have a friend or family member there to do it for you. They should start from your middle finger’s end and go all the way across your body. You want the calculation to be in inches.
As we mentioned earlier, most of the time, your body size is a great indicator of what your arm span draw length will be. In fact, the two measurements, in inches, should be the same. However, that’s not always the case. For some people, it’s better to calculate the above arm span in inches and then divide it by 2.5.
To know if you have to do that, we recommend you start with calculating your draw length using the arm span method. If the draw length feels a little too short or too long for you, then divide your arm span calculation by 2.5. Now, adjust your draw length and see how it works for you. It should feel better.
The Draw Length Board
If you ever go to a sporting goods store and ask about your draw length, they’ll measure it in a different way than the two methods we described above. What they’ll use instead is a draw length board. This is a device that can determine draw length without having to do an arm span measurement first.
Draw length boards are for compound bows only. When you pull your bow to its full draw, the board can track your draw cycle. Not only do you get your bow’s draw length, but you also glean information such as the nock travel, peak weight, and timing. For beginners, this can be valuable data that helps them improve their archery game.
Draw Length Calculator
Did the above seem kind of confusing? Are you perhaps daunted by all that math? No problem! You can always rely on a draw length calculator, such as this handy one from Archery Direct in New Zealand. All you have to do is put in your wingspan in millimeters, centimeters, or inches. So yes, you will have to take the time to let someone else measure your full arm span.
Once you have that number, put it in and the calculator will tell you the exact draw length you should use. For a man, five feet, nine inches is the standard arm span. For women, it’s five feet, four inches. Five feet, nine inches is about 70.8 inches total while five feet, four inches is about 63.6 inches.
If we were to use those averages, we can calculate the base draw length for a man and a woman with the calculator. For a man of average height, the draw length would be 28.25 inches. For a woman of average height, the draw length would be 25.50 inches.
Is the Draw Length Different Depending on the Bow You Use?
Throughout this article, we’ve described several different bow types. Still, most of the info we’ve given you has been general and applies for almost any bow you’d want to use. That said, you will likely use several different types of bows in your archery adventures until you get a feel for which one you like the most.
That begs the question then, does the draw length vary based on the bow you use? The answer to that is yes.
As we’ve stated several times throughout this guide, compound bows have a mechanical stop. This prevents you from pulling the bow back too far and damaging the components.
That’s not so much the case for a recurve bow. To prove that, just scroll back up a little further in this guide and check out the diagram of a recurve bow we shared. As you can see, there’s no stop mechanism to be found. That means you could theoretically pull the bow back as far as your arm would allow you with nothing pushing you back.
What you’ll more than likely do in such a scenario is snap the string. You could also damage the structural integrity of the bow depending on how badly you manipulate it. The bow itself might be damaged from the strain of your severe overdraw. To add insult to injury, you could also end up injuring yourself with poor form, as we mentioned.
It’s not that much different with longbows. In case you’re not familiar, a longbow is named such because of its hulking height. It’s meant to be oversized so you can get a better draw length when you use it. A popular choice for war and hunting in the olden days, the modern longbow is simply designed, as you can see below.
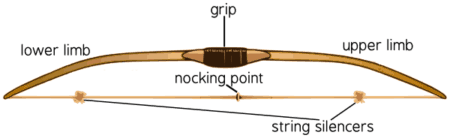
Image courtesy of WPClipart
The longbow has few parts. There’s the nocking point towards the center of the string, just like with a compound bow. String silencers, sometimes also called dampeners, are designed to stop the noise from the cable and the string upon use. These silencers can also cut back on vibration for more even, possibly more accurate shots.
What a longbow does not have is a stop mechanism, much like a recurve bow doesn’t. Again, that means there’s nothing stopping you from pulling the string back too far, snapping it, ruining your bow, and hurting yourself.
Let’s say you’re not at risk of overdrawing or even underdrawing the bow because you know better. Is the draw length still different from a compound bow to a recurve bow and a longbow? Yes. This is due to the design differences. The large size of a longbow, which would be sized to you, would certainly not have the same draw length as a recurve bow since that bow is shorter and curvier.
Rather than just assume you know the draw length from one bow type to another, use any of the techniques we outlined above to be sure. Given that there are calculators that do most of the draw length measurement work for you, you really have no excuse not to know your exact draw length.
Should You Use String Loops to Increase Draw Length?
Some archers rely on a string loop. This is sometimes also called a release loop. It’s typically made of nylon and is braided for archery purposes. You tie the cord twice around your bow string. The two loops are supposed to be between the nocking point. If you use a caliper release aid, the string loops work best.
So why use a string loop in the first place? What’s the benefit? When your nocking points and the caliper connect as you release an arrow, you get some pressure that could push the arrow up. That affects the accuracy of your shot. When set in the right place, string loops alleviates that pressure so your accuracy improves.
Not only that, but it’s possible to lessen the damage to a string. While caliper release aids can be helpful for some archers, these can also quickly wear down on the string. Once you adjust and then readjust your nocking points, the string’s stability begins to weaken. That’s not so if you have string loops.
Why would we be talking about string loops on an article about bow draw length? That’s because there’s the general assumption among archers that it’s possible to expand your draw length by tying on string loops. Some say your draw length could increase by an extra half an inch!
Is it true? Ah, not exactly. If you think you’re getting the extra draw length with string loops, it’s probably because you miscalculated your original draw length. If you’re following the AMO method specifically but you failed to add that 1.75 inches to your measurement, then your draw length is not correct. As soon as you add some string loops, you might think you’re getting an extra draw length. In reality, what you’re seeing is closer to what your draw length should be if you had calculated it correctly in the first place.
That doesn’t mean string loops have no place in your archery setup. There are some archers who believe it improves their draw length. That’s because when you tie a string loop to your bow, the positioning of the release hand will move. From where you normally keep this on the cheek, it’ll be pushed about a half inch past that. Again, this plus the miscalculation above makes it easy to assume that you’re getting a long draw length with string loops. It’s just not true, but if having string loops make you feel like you’re shooting better or more accurately, then go for it! Just know that your draw length is not any longer.
Does Draw Weight and Bow Weight Determine Draw Length?
Finally, we’d like to discuss draw weight and bow weight. The bow weight is pretty self-explanatory. Most bows are incredibly lightweight, with modern longbows averaging at two pounds. Recurve bows are a little heavier, with most weighing three pounds. Compound bows weigh even more, clocking in at around 4.5 pounds. And, although we didn’t discuss them in this guide, a crossbow would be the heaviest bow at about eight pounds.
Besides the weight of the bow itself, you also have to contend with the draw weight. What is the draw weight? This is how much pressure you put on the string, in pounds, to pull it back. The draw weight may be between 50 and 70 pounds, but it can be higher or lower depending on the type of bow and your draw length.
You should let the draw length determine what the best draw weight is for you. You should also consider your own level of comfort. If you can’t maneuver the bow the way you’d like because the draw weight is too heavy for you, then you’re not going to have a good time in archery. You’ll be in less control of your arrows and thus make less accurate shots.
To determine if your draw weight is good for you, you’ll have to take your max strength into account. This is the total amount of weight you could handle on your best day. Then, make sure the draw weight is 75 percent of that. You don’t want to push yourself on those days when you’re not feeling your best, which is why it’s 75 percent instead of 100 percent.
You’ll know your draw weight is too heavy if you get tired very quickly, like after firing a couple of arrows. Also, if you overbow your bow, which is when you can’t pull it as far as you’d like it, it’s time to recalculate the draw weight.
Does a heavier draw weight influence your arrow shooting speed? Well, it doesn’t slow you down, per se. You also won’t be shooting arrows at the speed of light unless your draw weight is below 60 pounds.
Take some time to get comfortable with your bow and arrow so you can determine the best draw weight for you. This is a big determining factor in how well you’ll shoot and how much you’ll enjoy your archery experience. Don’t just gloss over it.
Conclusion
The draw length of a bow is how far back you can pull the string before the bow begins resisting. Some bow types, such as compound bows, have mechanical stops that truly prevent you from pulling too far. Others, such as longbows or recurve bows, do not. That puts you at risk of underdrawing or even overdrawing your arrow.
There are many ways to determine your bow’s draw length. You can measure your arm span or follow the AMO method. You can also go to an archery store and use a draw length board or even an online calculator to save you on the math.
Once you do know your ideal draw length for your bow, that number can inform the draw weight you can handle. Just know that once you do calculate your draw length, you can’t really change it unless you were to grow taller. Even string loops and other gimmicks won’t extend the draw length.
Now that you know so much about the draw length of bows, it’s time to calculate your own. Good luck!
