
The question that is asked most often about paper tuning is why it is needed in the first place. Paper tuning is a simple but effective way of determining how your arrows behave during flight. This allows you to make appropriate adjustments and improve your arrow flight.
As the rest of this article will show, paper tuning is quite an easy process. Follow the easy steps provided here, and you’ll be shooting perfect arrows in no time.
Here are the basic steps to paper-tune a bow.
- Build Your Frame
- Stretch Your Paper
- Set Up Your Target
- Fire Away
- View Your Shots
- Evaluate Paper Holes
- Make Adjustments
- Finalize Your Group
- Ready for the Real Deal
What Do I Need?
Here is a list of things you will need to set up your paper tuning frame.
- Staple gun
- Furring strips (or any lumbar)
- Heavy butcher paper or wax paper
- Screws
- Screwdriver
- A hand drill
Instead of the screws and the screwdriver, you may also use nails and a hammer. You won’t need a hand drill if you do this.
1. Build Your Frame

The first step is building the frame on which our paper will be mounted. You can buy cheap furring strips from a local hardware store or use any scrap lumber you have lying around. All you need is a square frame. Use these furring strips or any lumbar to make a frame using a screw and a screwdriver or nails and a hammer.
We made a frame using two furring strips, both 8 feet in length. We cut the furring strips to make a frame using a Sawzall and screwed the frame together. The frame should look like the one shown in the picture.
2. Stretch Your Paper
Once the frame has been created, you can mount paper on it. You could attach a paper roll to make it easy to renew the paper, or you could attach sheets of paper using a staple gun to the frame. Make sure the paper is being pulled tightly across the frame. You may also use thumb pins or any other means to secure the paper.
3. Set Up Your Target
Once you have stretched the paper across the frame, it is ready to go. Before you start shooting, place the paper tuning frame in front of your block target (or whatever target you use to practice) so it can catch arrows once they pass through the paper. You could sharpen the legs of the frame so it can be put into soft ground, or you could add lumbar feet to your frame, allowing it to stand on any surface.
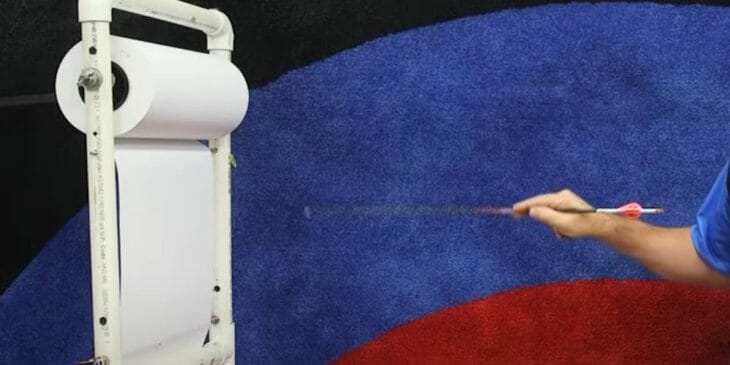
4. Fire Away

Now that the paper tuning frame is all set up, you can start shooting. Stand in front of the paper tuning frame about 10 feet away and align yourself such that the arrows passing through the paper hit the block target behind it.
While shooting, you should stand close to the paper because this would give you an idea of how your arrow behaves as it leaves the bow and what adjustments you should make.
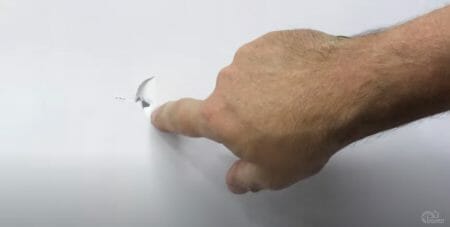
The tears on the paper produced by arrows passing through it tell you the behavior of your arrows and how you should adjust the rest and/or the nocking point. It may also give you feedback on better arrow and point selection.
5. View Your Shots
The tears on the paper represent how the point and the fletching passed through the paper and what adjustments you should make to make your arrow go as straight as possible.
Note that the instructions to follow are for right-handed shooters; if you’re a left-handed shooter, just switch the left with the right in these steps.
6. Evaluate Paper Holes
This is where you determine how your arrows behave during flight. The aim of the adjustments is to produce a perfect bullet hole with three cuts around it where the vanes pass through. For an arrow that flies straight, everything will be symmetrical.
A right-hand tear is when the point makes a hole a little to the right where the vanes passed through. This kind of tear indicates one or more of four things.
- The arrow has too little point weight
- The arrow is too stiff
- The draw weight you’re shooting with is not enough
- The arrow rest is too close to the sight window
You can solve this problem by one or more of the following adjustments;
- Choosing an arrow that has a lighter deflection spine
- Using a heavier point
- Cutting the arrow longer
- Adjusting the rest away from the rise
- Adding weight to the bow by tightening the limb bolts
A left-hand tear indicates one or more of the following things.
- The arrow bends too much (isn’t stiff enough or is too long)
- The arrow rest is placed too far away from the sight window
- The point has too much weight
This problem can be fixed by one or more of the following adjustments.
- Shortening your arrow or choose a stiffer arrow
- Choosing a lighter bullet point
- Moving the rest arm and the raiser closer together
- Lowering the draw weight
A high tear shows that the knocking point is adjusted too high, making the arrow tail-high as it leaves the bow. To fix this, move the knocking point downwards little by little till you get a perfect tear. A low tear shows the opposite of this and requires the opposite adjustment.
It is common to see a tear that is a combination of these, for example, a right-high tear. You will have to adjust for vertical misalignments and horizontal misalignment separately. In this case, first, lower your knocking point fixing the high-tearing, and then treat it as a right tear.

7. Make Adjustments

Larger and more misaligned tears require more dramatic adjustments. It is better to start with small increments and adjustments and evaluating tears continually. First, make windage adjustments measured in increments 1/16th of an inch. Next, chose a point weight and save the arrow spine adjustments for last. This is mostly a trial-and-error process, and you will need to have patience. (1)
8. Finalize Your Group
Now that you have tuned your bow and arrow perfectly, you can try shooting a group. You will probably see a much tighter group after having made these adjustments. Arrows that fly straight also experience less air drag and hence, are faster and have less drop.
9. Ready for the Real Deal
Your bow and arrows are ready for hunting. Learning to tune your hunting bow by yourself makes you understand better how your arrows work. This gives you confidence in your shooting, allowing you to shoot your very best. Confidence is of utmost value in bowhunting.
Paper tuning by Distance
To make your arrows finer-tuned, you could test your arrows at different distances and make adjustments accordingly. Here is how you paper-tune at three different distances.
Paper Tuning Distance 1: 5-6 ft
This Distance tells primarily about the bow. It tells;
- If the center is at the right place
- If the tiller and timing is at the proper place
- If the knocking point is at the right height
Paper Tuning Distance 2: 10-11 ft
This Distance is better at determining the properties of the arrow and the arrow spine. It tells;
- Stiffness of the arrow
- The weight distribution of the arrow
Paper Tuning Distance 3: 15-20 ft
This Distance primarily determines the air drag. It tells;
- The amount of air drag
- If the fletching is enough to stabilize the arrow
FAQs
What does it really mean to “tune” your bow?
Tuning your bow means making small adjustments to improve the behavior of your arrows during flight.
How do you define a well-tuned bow?
A well-tuned bow shoots arrows that fly straight without much wobble.
Conclusion
Paper tuning may not be as advanced a tool as a slow-motion camera, but it is almost as good at determining the behavior of arrows during flight nonetheless. Paper tuning also takes way less time and effort and is actually a smarter way than using a slow-motion camera. This is why serious hunters use paper tuning to make adjustments and perfect their shots. (2)
If you liked this article, please be sure to share it with others.
References
(1) trial-and-error process – https://www.britannica.com/topic/trial-and-error-learning
(2) slow-motion camera – https://www.digitalcameraworld.com/buying-guides/best-slow-motion-camera
