

It is fairly common for bows to break. Usually, this happens when you draw the string too far or curve the bow too much while stringing it. It is also possible that you get a fracture on your bow instead of completely breaking it. In this article, we go through the process of fixing both of these fractures.
There are different kinds of fixes for these fractures, so we have broken up the article into two parts. Whether you have a longbow or a recurve bow, you can fix it following these simple steps.
You can repair a broken longbow, or a recurve bow using FiberFix tape. All you need to do is soak the tape in water, wrap your bow, and leave the tape to harder for an hour.
You fix cracks in a recurve bow or a longbow by filling it in with laminate glue or the fiberglass resin and then leaving it to dry for 24 hours. You may sand the surface flat at the end.
Fixing a Broken Bow with FiberFix
FiberFix is the easiest way to fix a broken bow. FiberFix is a tape that claims to be “100 times stronger than duct tape”. If you’re wondering how the tape would keep the bow stiff, FiberFix actually hardens after application, making it adequate for fixing bows. In fact, they claim that it “hardens like steel.”
Things you will need to follow this method:
- FiberFix tape
- Sandpaper
- A glass of water
Here are the steps you need to follow to fix your bow with FiberFix.
1. Sand and Clean the Surface
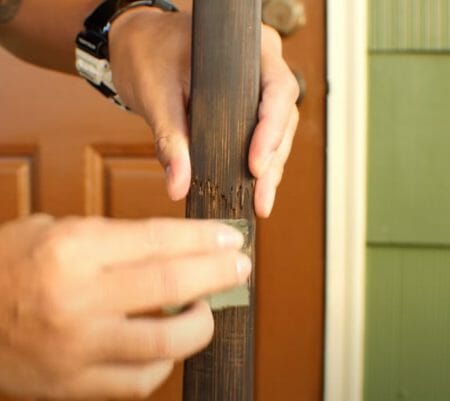
Bows can have a very smooth surface. This would make it hard for any adhesive to stick to the bow surface. To fix this problem, sand the surface around the break with sandpaper to make it rough before you move to the next step.
Make sure you sand enough area of the surface. The area you sand must be at least the width of the tape, but you will also go a few inches up and down while wrapping, so you need to sand a few inches more than the width of the tape on both sides.
After this, clean the surface with a wood cleaning solvent or a wet cloth to make sure there is no sand or debris on the bow surface. (1)
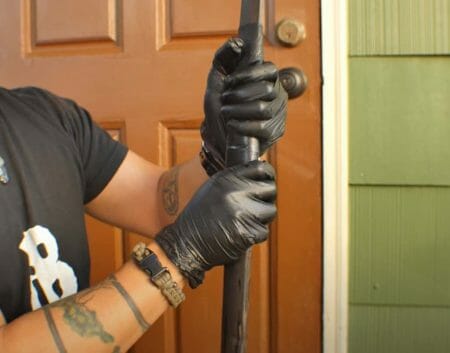
2. Put on Rubber Gloves

FiberFix comes with a pair of rubber gloves intended to be put on. Put on these gloves before you open the packet and keep these on throughout the process of applying the tape.
3. Activate With Water
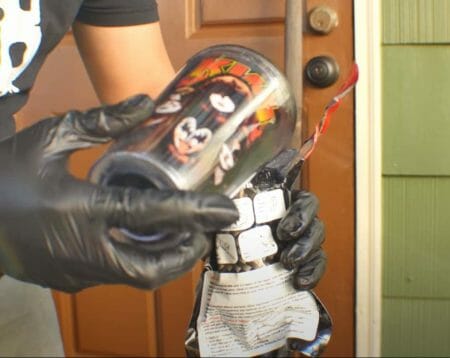
Wearing the gloves, tear the packet with the tape from the top. Do not take out the tape just yet. FiberFix tape is water-activated. You can use the packet as a container to pour water in.
Pour some lukewarm water into the packet and let the tape sit for 10 seconds while it soaks up the water.
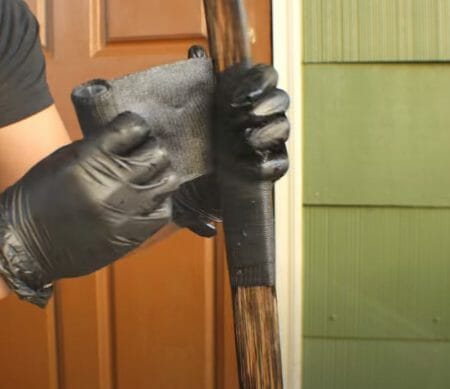
4. Drain Excess Water

Once the tape has soaked water sitting in lukewarm water for about 10 seconds, take it out of the packet with the gloves on. At this point, you have to squeeze the tape to drain out any excess water. Now the tape is ready to be wrapped. (2)
5. Start Wrapping
Before you tape the bow, make sure the two parts are fit together exactly right. The tighter the pieces are held together, the sturdier the bow will be once it is fixed.
Once the pieces are tightly in place, you can start wrapping the tape. Concentrate the first few wraps around the break because that is the weakest part, and the tape needs to be the thickest around there. While wrapping, go a few inches up and down from the break to smoothly distribute the tape and further ensure the hold of the tape.
6. Compress the Fibers
Once the tape is completely and smoothly wrapped around the break, squeeze the tape to drain any remaining water and compress the fibers. This will make the tape set in more densely.
7. Wait for it to Harden

FiberFix claims that the tape hardens in an hour, so the bow should be good to go in an hour after this. But you may leave it overnight just to be safe.
Once the tape hardens, your bow will be as stiff and strong as it ever was.
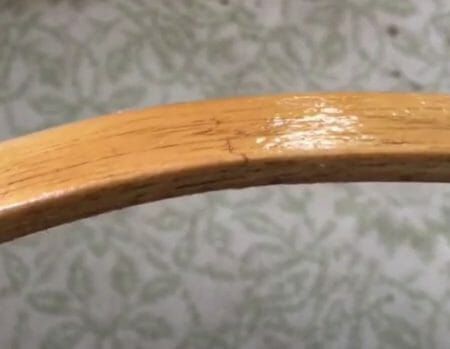
Fixing Hairline Fractures
Repeated stress on a bow can cause fractures on the bow. These fractures, if left unattended, can grow, and the bow can end up breaking. With the simple process provided here, you can fill these cracks, ensuring the integrity of your recurve or longbow.
Things you will need to follow this method:
- Fiberglass resin or laminate glue
- A popsicle stick
- Masking tape or painter’s tape
- Sandpaper
- A blade
Here are the steps you need to follow to fix cracks on a bow.
1. Clean the Surface
The first thing you will do is clean the surface near where the crack is, ensuring there is no dirt or debris left there. A clean surface will allow the painter’s tape or the masking tape in the next step to hold on to the surface and not let any glue spread to the unwanted areas.
2. Apply the Tape
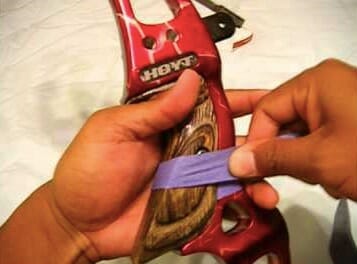
We apply the masking tape or the painter’s tape to concentrate the glue into the crack and to make sure that it does not spill into the surrounding surface.
Apply masking tape or painter’s tape covering the hairline crack and use a blade to cut a slit in the tape along the crack.
3. Fill in the Crack
Fill in the crack using laminate glue or fiberglass resin. You may use a Popsicle stick to put the glue into the crack. It is okay if some glue is coming out of the rack; we will sand it down.
Once you have put laminate glue or fiberglass resin into the crack, you have to wait 24 hours for it to dry.
4. Sand the Surface
Use 400-grit sandpaper to sand the surface and make it smooth. Once you are sure it is smooth, remove the tape and confirm using your thumb. You may tape and sand the surface again till you are satisfied.
You may want to watch the video below;
Longbows are broken more commonly, whereas hairline fractures are more common on recurve bows than on longbows. Regardless, these methods can be used whether you need to fix a longbow or a recurve bow. These methods can also be used for breaks and cracks on the raiser as well as on the limbs of both longbows and recurve bows.
References
(1) solvent – https://www.sciencedirect.com/topics/nursing-and-health-professions/solvent
(2) lukewarm water – https://www.scienceabc.com/nature/what-is-lukewarm-water-how-hot-is-it.html
