
Compound bow users enjoy setting up and tuning their arrows almost as much as shooting them. In addition, when you shoot a game with the equipment you set up yourself, you get a sense of satisfaction. While much of the work can be accomplished in a garage or home shop without a press, it is a good idea to have a local bow pro on speed dial as well, for advice, recommendations, and to handle any jobs you lack skills in.
Setting up a compound bow is not difficult for hunters of any skill level, and below were going to go through some of the steps to get started.
How to Get Started

A compound bow is a type of bow that has a long and flexible design. It is designed to make it easier for an archer to draw the string and maintain consistent aim. In order to set up one, you will need a few tools:
The most important tool you need for a compound bow setup is an arrow rest. You also need some way to measure the distance between your eye and the end of the arrow.
Compound Bow Setup: What Tools You’ll Need
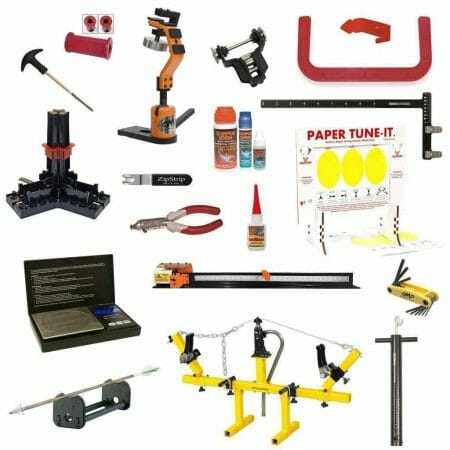
The tools needed for a compound bow set up are the following:
- Measuring tape
- An Allen wrench
- Bow press
- Bow jig
- String jig
- Bow square for setting the limbs
- Hex wrench or socket wrench set with 2mm Allen wrench
- Rubber wrap for protecting the limbs before gluing them in place.
- C-Clamp or rope, and of course the compound bow.
- Compound Bow Components

The main parts of the compound bow we are going through and tuning is listed below, if you don’t know what any of these are we recommend you search some of our beginner articles or take a look at our bow glossary:
- The riser
- The limb
- The string
- Arrow Rest
- Berger Hole
- Bow Sling
- Bow String
- Cable(s)
- Cable Guard
- Cable Slide
- D-Loop
- Fletchings / Vanes
- Grip
- Limb(s)
- Nock
- Nocking point
- Peep Sight
- Sight
- Silencing Aids
- Stabilizer
- String Vibration Arrester
- Tiller Measurement
1. Don’t Adjust the Bow’s Brace Height or String Length
The brace height is the height of the bow in a relaxed position, and the string length is the distance from a nocking point to a notch. You want these two measurements set up so that you’ll be able to draw your bow back without cocking it, but you want it to be snug when you’re pulling it back.
When you have your bow set up, there are some things that you should do. The first is to not adjust the brace height and string length of the bow. When you’re holding the bow, it’s important to be able to grip it at contact points. These include a pinch grip in the handgrip and a pinch grip on the backrest. A little adjustment here and you’re good. You want to make sure that the brace height is set to 7 inches or less, and the string length is set to 70-80%.
The brace height and string length should be set to fit the person using the bow. This is determined by measuring wrist to finger span. Adjusting these settings will result in inconsistent performance. If you adjust the brace height and string length of your bow, it can cause a problem called “brace height creep.” This is when a bow’s brace height changes as it starts taking more strain from the draw weight.
2. Mastering the Total Pounds Method

When you adjust your bow’s mass and its torsion, you use the key above in the tool list to adjust the arm upwards or downwards. As you adjust the limb up, it increases its mass. If you adjust it down, its mass decreases.
To find a comfortable bow mass, adjust it down. A bow’s performance is the best when it is at its highest mass. Field testing will reveal this.
You can measure your bow’s tiller with ease. Weight differential between upper or lower limbs can be determined by this measurement. A zero value is ideal. This can be done by hand. Take care when measuring this value.
The compound bow has three adjustment marks. The settings will all change if one is changed. Be deliberate. You can then change the settings after rotating to the lowest point. Make sure you do this carefully. Be sure not to adjust anything else.
3. Even Arm And The Rest Arm

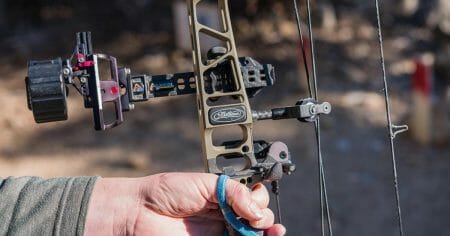
Arrow rests are normally attached to the side of your bow and aid in constant arrow placement. The rest, in certain situations, contains adjustments: up, down, left, and right, to enable you to fine-tune a perfect arrangement. When you draw back the bow, the rest can also aid keep the arrow in place; this is especially useful for beginners, shooting in the wind, or firing at severe angles such in field archery. The price and style might be rather different, so picking the right one can be difficult.
Compound bows include three different types of arrow rests:
Rigid: This rest is spring-loaded with a blade. These types are the most common rests. Problems often arise with them. If a bolt ends up touching the rest, problems may arise. A clearance problem might occur. Watch out.
Spring: Setting springs can be straight and to the point. The extension is loaded with a spring. A downward movement occurs. Clearance may also be an issue.
Falls vertically: When an arrow is shot, the rest of the bow falls vertically. It then flies straight. Those arrows will go low if they fall vertically prematurely.
Archery rests are controlled in two ways: “Shoot Through” and “Shoot Over”. Both methods can be used during the Spring rest.
Shoot Through: Move the index fletch down when the arrow is nocked on the bowstring. When two arms are on the arrow rest, the arrow sits between them.
Shoot Over: This should be done while the index fletch is up on the bowstring. This will ensure the fletch clears as the arrow passes through the rest of the string.
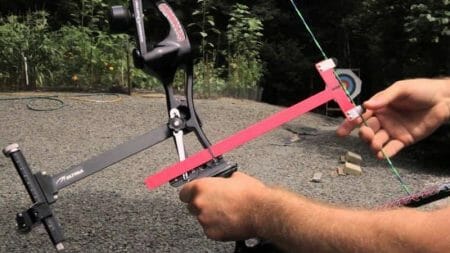
Locating The Even Arm
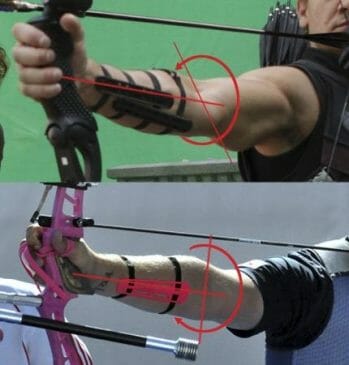
Your bow arm contributes much of the shot’s direction and bears the pressure of the draw and the bow’s burden. As a result, shooting with proper bone alignment and a balanced muscle strain is known to improve your score in a direct and favorable way. (1, 2)
The center point of the arm should be marked on your tape when the arm exits the riser. Next, draw a line on the tape where the center point should be to identify the area where it should be.
Your next step will be to measure each of the limbs to find the center. The distance between the arm’s center and the bowstring’s center should be calculated by taking measurements along the upper and lower limbs.
There is usually a 3/16 inches differential between the two centers, so mark that as well.
4. Arranging An Arrow Rest
- Set your bow up and use a long stabilizer to support it. Your bow should be set in a vertical position to ensure your arrow is connected to the bowstring and the arrow rest.
- You should line up your string with the arm-centered marks after you have positioned yourself with the arrow. You must align the shaft and point parts. Make sure your arrow and rest are centered on the string. When it’s centered on the string, it’s able to attach to the bowstring properly.
5. Determine The Nocking Point/Fit

- Set your bow square wherever you need to. In the next step, place the nocking points equal to the rest or slightly above the square. The top and bottom nocking points should be used always in the above procedure.
- When snapping the nock onto the string, be sure to use the proper point. Your nock should allow the string to move freely. In the case of compound bows, this is critical, since a poor fit can impact sighting.
6. The Cable Guards

The cable of some compound bows has a guard. As the arrow flies forward, make sure it has enough clearance to fly. Position the guard so that the cables are not overextended. Most commonly, cable guards are installed on the upper half of the riser rather than the lower half. These risers are usually found on compound bows.
7. The Pull of the Bow

Adjusting the bow’s pull should always be done according to the manufacturer’s instructions. Some compound bows come with only one size of cam, so the draw length can be adjusted. In order to adjust a bow with different-sized cams, you should always know the size of the pull before purchasing it.
8. Positioning The Sight
- Bring the string to the middle and fold it. To accomplish the above, press against the string. Alternatively, you can skip the step of pressing against the string.
- Instead, pull the bow near the anchor point. Move the peep upwards or downwards. Position the peep so everything is in line with the sight.
- Securing knots on both sides of the bow peep will allow the peep to be attached to the string. The center of the bow peep should never be secured. Alterations will not be possible if the center is secured. If that is the case, you will not see a peep when you fully draw the bowstring.
9. Timing of the Wheel and Cams

- The timing of the wheel and cam are crucial. Release the bow tension. Disconnect the wheel cable. Twist or remove the wires from the cables now.
- Install the cables back on the wheel or cam. Take the bow’s tension off again. Make sure the cams are on the proper timing. It should be possible to reach full draw simultaneously if both cams were adjusted correctly.
10. Target Your Bow

- Place the scope on your sight to start. After you set that, move to the next axis. Align the bow in a level position.
- Take your string level and place it on the string. Make sure the string is level by adjusting the bow risers. Keep your bow steady by not picking it up. Removing the string level is important.
- Position the string sideways on the bar. The sidebar extension bar is attached to the sidebar by screws. Remove these screws. You need to adjust the extension bars until they are level, then tighten the extension bar screws.
- The second axis must be adjusted as well. That is not that difficult. Aim to have the bubble at the same height as the sight bar and bowstring.
- Let’s take a closer look at the third axle. Turn your gaze away from the axle by 30 degrees. Turn your gaze downward by 30 degrees. If the bubble isn’t level, you will need to adjust the third axis so that the bubble is in the center.
Concluding Thoughts
Here, we’ve attempted to provide a description of how to set up a compound bow. For many years, these simple steps have provided good results in keeping compound bows in good condition. Implement these steps into your compound bow maintenance routine.
References
(1) proper bone alignment – https://www.verywellhealth.com/posture-and-alignment-296665
(2) muscle strain – https://www.healthline.com/health/strains
