

The fastest way to get better at shooting with a bow is by first adopting a good posture and shifting your bow and arrow to the perfect position for your body type. Before you start practicing for long-range and other difficult shots, practice indoors with a short-range target. We will get into some more in-depth tips below.
Shooting a bow is easy but shooting a bow better is about improving details in your technique. Here, we’ll review the basics of a good shot and give you nine tips for shooting better.
Although most instinctive skills while shooting comes from practice, there are some techniques that can improve your aim instantly. Using these techniques will also accelerate your instinctive learning process, ensuring you actually spend your practice time perfecting your intuition instead of correcting avoidable mistakes.
1. Tune your Bow and your Posture

Consistency is the key. When you’re shooting, you don’t really improve much if you keep changing your form. It’s the same with other things such as your draw weight and the arrows used. Before aiming for consistency, you need to learn the right form and tune your bow. Here’s an article you can refer to on how to measure bow draw weight.
Posture can significantly improve your aim in a matter of a day. The best way to learn proper form is to draw your bow in front of a mirror and look at your posture from different angles. Compare your posture with pro archers stances and perfect your form.
You might have heard of the archer’s paradox. This effect is the reason arrows wobble when they leave the bow. If your bow and arrow are not tuned, the point of the arrow will keep wobbling, resulting in poor shots. It is impossible to shoot accurately consistently if the point keeps wobbling. There are many adjustments that can minimize the wobbling, such as draw weight, point weight, spine length, and spine stiffness. If you’re not familiar with paper tuning and other ways of minimizing the archer’s paradox, we would suggest visiting an archery store or asking some expert archer you know to teach you.
2. Don’t Practice Long-Range

Shooting long-range is not a good idea for practice if you’re a beginner or an average shooter. You need to perfect your aim. If you started shooting long range and outdoors, you won’t be able to tell if it was bag aiming that made you miss the target or if it was the wind.
Your brain adapts instantly through repetition and continuous feedback. When you miss the target, your brain subconsciously tries to adapt to the negative feedback by trying to avoid whatever you did differently that made you miss the target. Similarly, when you hit a target, your brain receives positive feedback and tries to take notes of what you did that allowed you to shoot well. However, this only works if you are in complete control. Your brain assumes that it was something you did that made you hit or miss the target. (1)
If you’re shooting at long ranges outside, fluctuations in the wind will result in a large random error. This means that a good aim will not ensure a hit, and even a bad aim can score a hit. The feedbacks from such a practice will be mostly random, and you won’t get anywhere.
Hence, as a beginner, you should always practice on short-range targets to improve your aim. How well you can improve your aim is not limited by distance; you can always try to shoot closer to the center of the bullseye.
Once you have perfected your aim, you can start training at long range and start developing instants to balance the offset of wind. But the good aim is a prerequisite for learning to shoot in the wind.
3. Shoot at Odd Distances

The pins and marks in bow sights are discrete and usually set for equally-spaced distances such as 10 yards, 15 yards, and 20 yards. But you’re unlikely to come across a target at exactly one of these distances in the field. Hence training standing at a given distance from the target board is not enough to prepare you for the real thing.
It is best to stand at some odd distance from the target while practicing. Any distance that is not a multiple of 5 yards can qualify as an odd distance. For even more realistic practice, stand at random distances away from the target. This will allow you to instinctively guess the distance from the target and adjust for drop accordingly. This will help you figure out which pin to aim for or whether to aim between the pins when shooting in the field.
4. Shoot at Different Angles
Did you know that the drop due to gravity only depends on your horizontal distance from the target? Training at the level ground with the target is not enough. There are a lot of factors that affect the drop while shooting at a target that is not on the ground. You will encounter many situations where you’re not level with the target, and all your training will go out the window. Unless…you train for such targets.
You can train for this by placing the target board at a height to train for shooting targets above you, and you can stand at a higher platform to train for shooting targets below you.
Drop due to gravity is only determined by your distance from the target horizontally. Consider you’re standing 17 yards away from the target, and your level is 8 yards above the level of the target. You will be 15 yards away from the target horizontally (you can use the Pythagorean theorem to verify this if you’re good at math). But since the drop is determined by horizontal distance only, you will shoot the target as if it was 15 yards away and not 17 yards away. But it is hard enough to know the distance from the target, let alone to figure out the horizontal distance. So, your best bet is to practice and develop instincts.
Another complication is that the arrow slows down due to air drag just the same. However, the effects of air drag are more prominent when you’re shooting a target below you than when you’re shooting a target above you. Unless you’re a robot, it’s not possible to figure it all out. You can, however, learn through practice.
Pro Tip:
Use arrows with denser spine material to minimize the effect of wind drift. Carbon arrows and full metal arrows are better against the wind than aluminum arrows. Higher density arrows do not necessarily require higher draw weight as they can have a thinner spine. (2)
5. Explore your Stance

Once you’re more comfortable with shooting, you can experiment with different stances. But remember that the goal of a good stance is to allow you to shoot as comfortably as possible. The fewer muscles you have to contract while drawing, the better you will be able to focus on the muscles on your draw and bow arms. This will allow you to shoot with better precision and improve your shooting style more. You can test this theory by trying to shoot while flexing backward like Keanu Reeves in the matrix. We guarantee that you will not be able to shoot with accuracy.
6. Practice with 3D Targets
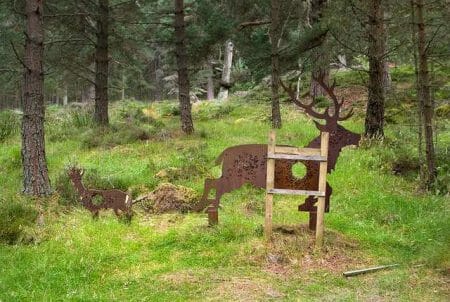
One drawback of shooting at a target board is that there’s no bullseye on a white-tailed deer. While shooting in the field, you won’t have a bright yellow target to shoot at; you will have to fix your eyes on where you want to shoot yourself. Hence, training your eyes to shoot at a bullseye might prove counterproductive. I personally prefer shooting at 3D targets. 3D targets may also help you train your ability to guess your distance from a target.
7. Shoot in Different Lighting Conditions
Your target in the field won’t have spotlights directed towards it. You will most likely have to face undesirable lighting conditions, and you can face such conditions best if you train for it. In the field, particularly when it’s dusk, you might face situations when you can only see the outline of a deer. You will have to learn to figure out the vital parts of the deer in such conditions. You can train for different lighting conditions by dimming the lights, training outside at dusk, placing the light source behind the target, and other such configurations.
8. Train your Drawing Muscles
Higher draw weight undeniably has its advantages. Other things being equal, a higher draw weight allows one to shoot arrows with higher momentum. This results in arrows that travel faster, which minimizes the delay between releasing the arrow and hitting the target. The higher momentum also ensures that the arrows penetrate deeper, neutralizing the target instead of just injuring it. Higher speed also lowers the drop, which allows you to shoot more accurately, even at long distances.
However, higher draw weight requires more powerful upper body strength. And you improve your upper body by training the muscles you use while you draw.
Practice drawing the bow even if you’re not going to shoot the arrow. It will also improve your aim to draw the bow at full draw and hold it in place. One of the things that may lower your accuracy is the trembling draw arm when you’re holding the arrow at full draw. The discomfort of holding at full draw and the urge to just let the arrow go may force you to shoot sooner than you would otherwise. This would not seem like an issue during practice, but in the field, you have windows of golden opportunities, and you may have to keep the arrow is drawn and ready to shoot for longer periods of time.
9. Diversify your Training

While we’re talking about windows of opportunities, it’s only realistic to accept that you may not get any. The field is infinitely more unpredictable than your range. The only thing you can count on is your instincts. Hence, while training, try to incorporate as much diversity as possible. Set different challenges for yourself. Shoot while standing at a slope. Place different obstacles between the target and yourself to block your view. You can be creative and use objects and structures around you to design fun challenges for yourself.
I like to set a timer on my phone (usually 20 seconds) before I draw the bow. Since I cannot count the seconds, I can’t make an accurate guess of when the timer will ring. The challenge is that I have to shoot the arrow when the timer rings. This game helps me get better at shooting under pressure (it’s pretty fun, I must admit)
I would encourage you to design such challenges for yourself.
10. Accuracy. Accuracy. Accuracy
Accuracy is more important than anything else. You might hear from bulkier individuals than you that draw weight plays a huge role, but that is not entirely true. The only reason you should consider increasing the draw weight is so you can decrease the drop and increase the accuracy.
11. Don’t Sacrifice Accuracy for Anything
Slow and steady wins the race, and this is just as true in archery as it is in anything else. Take your time before you shoot. If you’re not sure, it’s better to take your time and wait for a better opportunity to shoot. If you shoot at a nonlethal part of the animal, it won’t only run away, but it’ll also suffer in pain for up to a few days before it finally dies. It’s better for you and is more ethical to shoot only when you’re sure.
12. Choose Faster Arrows
Faster arrows reach the target quicker and experience less drop. You can increase the speed of your arrows by choosing a thinner spine and a denser material.
13. Release Quickly
Your release should be as quick as possible. This not only shortens the time taken to hit the target after release but also ensures that the arrow doesn’t get disturbed at the last second. If you have to trade your draw weight to shorten your release, do it.
14. Don’t Hold the Pin Still
In my experience, trying to hold the pit fixed at the bull’s eye actually decreases your accuracy. This is because focusing your balancing muscles to make minor adjustments draws your attention away from your major muscles. Instead, what you should do is to let the pit float over the target and release the arrow at the exact instant as the pin reaches the target.
Some of the techniques we discussed are more advanced than others. I wouldn’t advise practicing for different lightings, for example, if you haven’t got your aiming figured out. However, whatever your experience level is, you can benefit from incorporating most of these training techniques into your routine.
For additional information especially for those who are beginners, you may want to check this article guide on how far can a bow shoot. Until our next article!
References
(1) repetition – https://www.masterclass.com/articles/writing-101-what-is-repetition-7-types-of-repetition-in-writing-with-examples
(2) Carbon – https://www.britannica.com/science/carbon-chemical-element
