

Whether you’re striving for a gold archery medal in your next competition or are going out for a deer hunt, you’ll perform better if you learn the fundamentals of traditional archery.
The key fact to remember when learning to shoot a bow or trying out a new shooting style is that consistency is the foundation of success. To be effective, you must train your body’s muscle memory which involves reducing the thinking involved and going with your gut.
What is Instinctive Bow Shooting?
According to the famous book by Fred Asbell, the instinctive shooting method was first developed primarily for shooting recurve bows, but with a few tweaks, you can adapt it for use with self bows and longbows. Your body’s ability to shoot correctly without aiming is at the heart of instinctive bow shooting. This is the most conventional technique of shooting because it does not require the use of sights.
Humans have used archery since the dawn of time, and instinctive shooting is one of the oldest forms of archery. Since instinctive shooting is dependent on archer skill rather than sight, it is a technique that takes a lot of practice to master.
Quick Steps on How to Aim a Bow Without Sights
Archery is a mental state. And by training shooting without sight, you are essentially becoming one with the bow. Isn’t that what it’s all about when you’re shooting? Below, I’d love to show you how to shoot a recurve bow instinctively:
1. It Begins With Your Stance

First and foremost, you’ve undoubtedly heard it before, but in any sort of archery activity, your stance is critical. Stand 90 degrees to the target, with the outside edge of your non-dominant foot in line with the target.
This refers to the outside edge of your left foot for right-handed archers. You should be facing the target sideways. You can adjust how far lateral you’re facing as you get better and more comfortable, but as of now, stick with the side-facing target method. Ensure that your feet are at least shoulder-width apart when standing.
When it comes to instinctive archery, shooting form is crucial. Your stance is the first step in having excellent shooting form.
There are two stances available, and I’m here to break it all down for you:
- Squared Stance – the shooting line should be parallel to your feet.
- Oblique Stance – this position, also known as open stance, includes your lead foot pointing towards your target.
Novice archers are advised to use the squared stance. Shooting from this position allows you to make the most of your back muscles.
2. Nocking is an Art
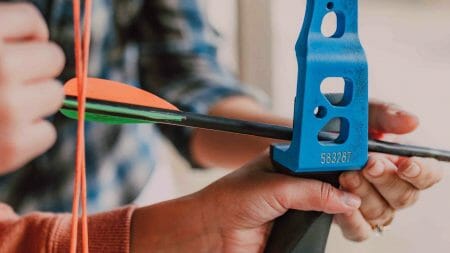
Have you ever realized how vital the slightest nuances are in archery? And nocking is the clearest example of this attention to detail. Let’s divide this easy yet crucial step down into manageable parts.
- Grab an arrow.
- Put the arrow’s shaft on the arrow rest on your bow. You may check the best arrow rest in the market nowadays.
- Place your arrow’s nock on the bowstring and secure it.
- Push it till it clicks.
It’s critical to create a shot sequence that is consistent. Before each shot, you must complete the same things in the same order. This is critical because it trains the shot sequence in the subconscious mind over time, making it second nature to execute every shot. (1)
These small steps could only last a few seconds; however, every second counts, as a classic hunter would say. You’ll be on your way to outstanding instinctive shooting if you commit these techniques to muscle memory.
3. The Proper Grip

Another critical aspect of instinctive archery is how you hold your bow. Make sure your bow is resting comfortably on the pad of your thumb with your non-dominant hand. Squeezing the bow too hard can cause it to twist inward. You could also injure yourself if your forearm takes the brunt of the blow.
Your bow hand should have a light grip, almost as though the bow is resting lightly on the top of your hand. Instead of tightening your grip on the bow, make it a habit to double-check that you’re softly supporting it as part of the shot sequence.
4. Bracing for the Draw
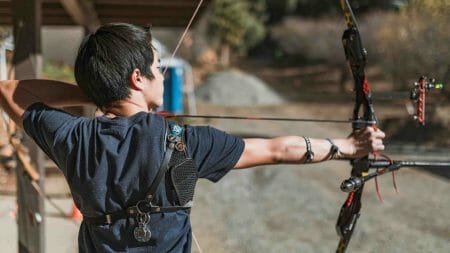
It’s a small thing, but it’s vital. Raise the non-dominant arm to shoulder height. The majority of archers overlook this essential modification. Since you don’t have any sights to depend on, making sure the bow is at shoulder level will assist you in finding your target.
5. Anchoring the Bow String
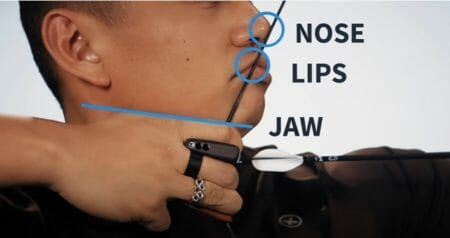
What is an anchor point? This is essentially a location on your face where you feel comfortable placing the draw’s tip. Using an anchor point will ensure that your draw is seamless and constant.
You’ll need to establish an anchor point on your face once you’ve pulled the bow to full draw. A good anchor point is essential to keeping stability in your draw length and where the arrow is located about your eye and head when learning how to shoot a bow instinctively. Pulling the string back to the point where your middle finger touches the corner of your mouth is a good idea. The most reliable anchor point is between the middle finger and the corner of the mouth.
6. Take Aim!

It can be intimidating to aim without using sight. But this must not be the case. To emphasize that archery is a state of mind, make seeking as natural as possible. Do not overthink this; trying harder will cause you to become stressed, causing you to lose concentration on your aim.
A mix of decent form and a strong focus on your target is necessary for instinctive shooting. This means you must concentrate intensely on the tiniest spot on your target and keep it there until the arrow has hit.
Many people compare this shooting method to throwing a ball. Consider how you toss a ball: you simply throw it with the goal of it going where you want it to go. Some people, though, have a stronger affinity for this than others.
The only reason the ball or arrow goes where you want it to is because of muscle memory. Even muscle memory allows an excellent drummer to move all four limbs in diverse ways at the same time while maintaining rhythm. (2)
Plenty of regular practice, and by tons, I mean loads of training, trains your muscle memory. This kind of archery takes a lot more work; being very skilled at this entirely natural shooting style can take years.
You must maintain extreme concentration on the one-inch circle on the target you’re aiming at until the arrow has reached the mark. Shooting and holding your pose until you hear the arrow hit is a beautiful habit to develop.
Do this each and every time you take a shot. With any style of archery, getting this drilled into your subconscious will improve your accuracy over time.
7. Let Your Arrow Fly (and Follow Through Too!)
To shoot, softly pull your fingers on the bowstring in a natural frame of mind. Follow through with your draw hand, moving towards the bottom half of your ear as the arrow launches.
You’re doing this to get your bow to tip forward. This motion ensures that the energy stored in the bow is correctly passed to the arrow.
Focusing closely on the target while you draw your bow is essential for learning how to shoot a bow effectively. When your finger meets the anchor point, just relax the back of your hand to release the string and release the arrow.
It’s crucial not to grip the bow at full draw and try to “shoot,” but to let go of the arrow once your finger hits your anchor point. While training to shoot a bow, it’s a good idea to get into the habit of leaving your string hand on your face for a few moments after the arrow has been released and noting its location. You may tell if you released at your anchor point or not by leaving your string hand in place after the arrow has fired.
Breaking Down the Various Steps on Shooting Without Sights
Aiming should be an instinctive action. After practicing and maintaining this mindset, you may work on other shooting tactics to aid in an instinctive shooting. These are the methods:
Gap Shooting
Archery gap shooting involves aligning the point of the arrow with the objective and judging distance. Essentially, you learn your optimal range during multiple practice shots; this is the range at which you will hit the target accurately while pointing squarely at it.
From here, you may start to know how far up or down the target you should aim, based on how far away or close the target is.

Look at the figure above to see what an arrow trajectory seems like. “Point on” is a gap shoot technique, which means you’re standing precisely the length of the direction of movement from your arrow to the target.
Imagine a vertical arching line between the point of your arrow to the center of your target. Also, depending on the distance, you may need to change the point at which the imaginary line connects. As an example:
- Ten yards – the imaginary line is a few centimeters beneath the objective.
- Sixty yards – the imaginary line is a few centimeters above the target.
Repeat shots in gap shooting to determine whether the line needs tweaking. Three shots is a sufficient number to take. After three shots, you’ll be able to make the necessary adjustments to hit your target.
Face Walking
Adjust your shot by altering the anchor points on your face. The tip of your arrow is pointed squarely at your target. You’d be able to identify an anchor point that would strike your targets if you use it in conjunction with the gap shoot approach.
String Walking
Rather than moving anchor points, this technique requires you to shift the placement of your draw hand. As a general rule, the lower your draw hand should be on the bowstring, the closer your target is.
Instinctive Shooting
Believe your intuition; that’s the foundation of instinctive shooting. Rather than directly pointing at a target, instinctive shooting requires you to concentrate on where you want your arrow to strike. This technique combines instinct, talent, and fate. It is famous as the most refined form of archery shooting.
Concentrating on the fundamentals of instinctive archery consists mainly of firing a bow without the use of sights. It is essentially a reflection of how traditional hunters shot. The instinctive archery focuses primarily on recurve bows — no fancy gears or devices.
The Pros and Cons of Instinctive Archery
The following are some reasons for and against instinctive shooting:
The Benefits
- Build Muscle Memories – Practicing aiming a bow without sights encourages the usage of many archery methods to help you become a better shooter. Even minor things can be the distinction between a strike and a miss.
- Mastery of the Basics – Instinctive shooting lets you go down to basics. It enables you to see how traditional shooters hunt. It is difficult, but understanding the many difficulties hunters faced in the past will give you greater regard and respect for archery.
- Improves Patience – Patience is taught through instinctive shooting, whether for hunting or target archery.
The Drawbacks
- It can be Time-Consuming – After all, it’s a game of trial and error. Shooting arrows without sights can be difficult. You must be patient to achieve proper shooting form and action.
- Might Tire and Pull a Muscle in Your Arms – Considering the number of arrows you’re likely to shoot, instinctive archery can lead to strained arms.
How to Achieve Aim Recurve Bow Instinctively (Tips & Tricks)?
There is no short-term fix or fast approach to master instinctive archery. Hard devotion, dedication, and practice will get you there.
However, there is one form of training for instinctive shooting, which is paper cup training. Fix a paper cup to a target and stand two meters away to do this. Shoot your arrows into the cup while focusing all of your attention on the inside of the cup. Move back two meters after achieving a hit into the cup, then refresh and repeat the procedure until you reach a distance of 20 meters away from the cup.
Then it’s only a matter of moving forward once you’ve reached the 20-meter mark. This keeps your mind busy, your body moving, and your muscle memory committed to those distances.
Mastering instinctive shooting takes practice, so don’t be too hard on yourself if you don’t strike your target on the first few shots. It takes practice to stay effective; but, if you devote yourself to this excellent technique, I am confident that you will be successful.
References
(1) subconscious mind – https://thriveglobal.com/stories/subconscious-mind-how-to-unlock-and-use-its-power/
(2) muscle memory – https://medium.com/oxford-university/the-amazing-phenomenon-of-muscle-memory-fb1cc4c4726
